litecoin rig setup
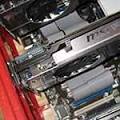
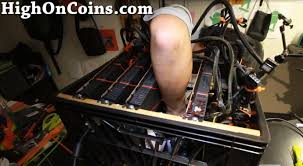
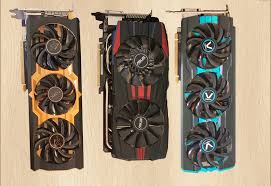
Want to get into mining digital currency (bitcoins, litecoins, and/or other altcoins), but have no idea how to go about it?This guide will take a complete beginner through the various steps involved in building your own power-efficient ~1900 kH/sec litecoin mining computer.Guide: Build your own Litecoin Mining Rig 4/06/2017: This guide is nearly four years old.While the Windows and Linux setup portions are still somewhat useful in a general sense, please don’t attempt to buy any of the hardware recommended in part 1—it’s quite obsolete!If you’re looking for information about modern GPU mining, please click here for my updated 2017 guide on Ethereum mining.Click the image or heading in each section to jump to that piece of the guide.Part 1: Hardware Learn what components give you the best bang-for-the-buck when it comes to litecoin mining.See what you’ll need to pack multiple GPUs into a single computer for maximum efficiency.Then, follow a step-by-step guide on how to assemble everything into a plastic milk crate to facilitate airflow and cooling.

Part 2: Linux Setup Follow a detailed set of instructions that will have you up and running with Linux on your litecoin mining rig in about an hour.The guide is tailored to the complete Linux beginner and includes every single command that you’ll need to input—no guesswork or incomplete steps!Part 3: Windows Setup If Windows is more to your liking, we’ve got a guide for you, too.Covers a complete installation from start to finish: BIOS settings, drivers, mining software, auto-startup, remote admin, and more.For more advanced users, undervolting your GPUs (to save power) is also included as an optional step in the guide.Part 4: Optimization After you’ve got your litecoin mining rig running, check out the optimization guide for tips on getting the best performance possible from your GPUs via overclocking and cgminer tweaks.Also learn how to set up an automatic failover mining pool, so that your rig will continue mining even if your primary pool becomes unavailable.Part 5: Mining FAQ Read the rest of the guide, but still have some questions?

Chances are it’s covered in this FAQ.Jump to: , This guide will give you detailed information on installing Debian Linux, the AMD video drivers (GPU), the AMD APP SDK, and cgminer (with temperature readings and changing graphics card clock speeds, voltages, etc).
mine litecoin on windowsNote: This guide sets you up to run cgminer as root; if you need a different configuration, be sure to modify your install process.
china dominate bitcoinThe warning to use strong passwords exists for a reason!
java bitcoin virusThis article is copied from the LURKMORE wiki and may not be the most recent version.
bitcoin-qt change languageContents 1 2 3 4 5 6 7 Please note that using this guide with Debian 6.0.9, instead of the latest Debian, will result in 100% success.
moneda bitcoin cuanto vale
Do not use the latest version of Debian!!!!!!!Download either UNetbootin or Rufus to copy your Debian image to a USB memory stick.Rufus is supposedly twice as fast as the other available options.If using Rufus, you must first download a copy of Debian, the 32-bit (i386, x86) version should be fine regardless of your system configuration.
nasdaq bitcoin blockchainIf using UNetbootin: (*) Distribution -> Debian -> Stable_NetInstall Start the computer with the key plugged in.
bitcoin gouvernementWhen the installer begins, select Install.
and litecoin rigThe default keymap is usually what you want.
bitcoin 2023You can just select Continue for the hostname screen.The default is fine.The domain name can be blank, select Continue.
Choose a secure password for your root account.The root account controls the entire system and can be logged in to by any computer on the network.If a person gains access to your router, they can also access that PC.A secure password will prevent anyone else from gaining access to the computer.Either type in a name for your user account, or leave it blank.Select a new username for your account, it can be anything that you want to log in to.Select a secure password for that new account.During the disk setup, there are two methods.The simplest method is to select the following: A more advanced method would be to remove the swap partition and save writes to your USB key: Select your country to get a list of download mirrors local to you.Select a mirror which you believe to be closest.Leave the page asking about a proxy blank, just select Continue.Software selection: Deselect all default options (Spacebar) and enable [*] SSH server.Install the GRUB boot loader...: Yes.Now that Debian Linux is installed, you no longer have to sit in front of the rig's monitor.

You can log in to your system remotely with any SSH, SCP or SFTP program.If you are using Windows, I suggest WinSCP and PuTTY.Log in as username root, using your root password.# apt-get update && apt-get upgrade # apt-get install autoconf bzip2 fglrx-driver git libcurl4-openssl-dev libncurses5-dev libtool libudev-dev ntp screen unzip xdm # n --force Initial graphics card setup (also do this after adding or removing cards): # rm /etc/X11/xorg.conf && aticonfig --adapter=all --initial # /wordpress/media/2012/11/AMD-APP-SDK-v2.8-lnx32.tgz && tar xzf AMD-APP-SDK-v2.8-lnx32.tgz && sh Install-AMD-APP.sh && cd .. cgminer 3.1.1 is what we use, though the newer Rx series video cards may require version 3.7.2.All versions tend to have the same mining performance, later versions generally just include support for newer Bitcoin mining hardware.You can use any version you want by changing the download URL and updating the filenames in the commands below.# cd cgminer && git checkout v3.1.1 # /mining/ADL_SDK.zip && unzip -j ADL_SDK.zip 'include/adl_*.h' # cd .. && ./autogen.sh && ./configure --enable-opencl --enable-scrypt && make && make install # cd && rm -rf cgminer && mkdir .cgminer Put your cgminer.conf file in /root/.cgminer and add your configuration information (pools, thread-concurrency, etc).
Your setup is now complete.You can type cgminer in any location to begin mining.The .bin file for your GPUs will be generated, on first run, in the directory where you've run cgminer.You can use a program--which we installed near the beginning of the setup--called Screen to run cgminer without having to keep an SSH session open at all times.Using Screen, you can also have the system autostart cgminer while giving you the ability to check on it after it's started.Before starting cgminer, use the following command to open a screen window that you can attach to again later: screen -S cgminer.After that, you can type cgminer as you usually would.Now that you've got cgminer running properly, you might want to close your SSH window, or maybe just go back to the command line and do other things.You can exit that Screen session (detach) by hitting the keys ctrl+a d.You can get back in to your Screen session (reattach) by simply typing screen -r.You can also use Screen for any other long running task which you may not want to have a window open for the duration of its run time.