litecoin 7 gpu

On the 1st of December 2016, Microsoft released their new Nvidia-powered Virtual Machines(VMs) to the general public.They came with two options of GPUs: NVIDIA Tesla K80 or the NVIDIA Tesla M60This sort of GPU is meant for scientific research and video encoding yet as I rushed to get my hands on one of the VMs, I was wondering what I would do with it and the idea struck me: ‘Bitcoin Mining!YES!, I could make thousands of pounds with these amazing GPUs’, I foolishly thought as I deployed a Ubuntu 16.04 VM.I chose the NV-12 variant, which offered 2 M60 GPUs with 12 cores and 112GB of RAM.But this came at a price; £1,275.37 to be exact.Obviously, I could not afford this and my dreams began to fade as I opened the calculator and calculated that the VM would cost £1.77 per hour.I still had hope that perhaps I could mine more than this in an hour.I started up PUTTY and connected to the machine.I typed in my password and set to work:I made it easier than last time to do it as I compiled all the commands required into a simple script.
Simply:This will install all the required drivers and then generate a wallet address.Once that has been completed all you need to do is start mining (Yes, it’s that simple).To mine you will need a pool (I recommend using Minergate).Once you have signed up, run this command and replace ‘YOUREMAIL’ with your email:Once the miner has been compiled and installed, it is time to start mining.I decided to mine Litecoin(LTC) on this occasion.You will need a mining pool .For this example, I used Minergate.:3336 -u YOUR_EMAIL -p xPaste that command into the terminal and your off!Unfortunately, my dreams of making thousands were dashed as the terminal printed out the speed of mining.I had gone from £1000s to pennies.Thank you for reading and have a good day.Download this video for viewing in HD on your smartphone or computer.Click Here to Download High-Quality HD video to your Smartphone or Computer.Well, it’s been a very long time since my last post but I am back, better than ever!I took a 3-week trip to South Korea in January to see my parents and during that time I couldn’t wait to build rigs again.
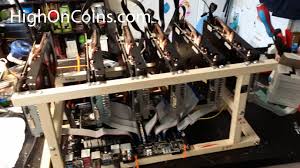
But during that 3-week off, I did a whole lot of research on how to make even more efficient litecoin rigs than using milk crates.First, I considered using square aluminum tubing, which some of the miners are using but the cost of using aluminum was a bit too much (near $50 range) and also aluminum conducts electricity, not really the best choice.Then I had an idea, make the same rig using square wood!After a long trial-and-error (of building around 5 different wooden frames), I finally found a sweetspot, and came up with my own design that will fit 6 graphic cards while giving it very efficient air cooling.
gh/s bitcoin wikiI am sure you will come up with your own design one day but for now, this is a great design to start with so, have a look!
bitcoin comedy centralYou will need 6 pieces of 3-feet square wood.
bitcoin value dkk
You can use other sizes if you want though since we will be cutting them anyways.For this HighOnCoins rig frame design, you will need: That’s all the wood you will need to build the frame, which costed me around $9.So under $10, you can build a sturdy frame that will run 6 graphic cards with nice spacing.You can also modify this design to make it longer if you want.(But I find that 22″ is perfect as anything longer will require you to use longer-sized PCIe risers, which are hard to find these days.
compile bitcoin in linuxThis design will use 2 long risers and rest can be medium/short-sized risers.)
ethereum 1060 gtxOnce the pieces are cut, your first job is to make a “rectangle” using 2 22″ pieces and 2 14.5″ inch pieces as shown below: Step 3.
bitcoin is unstoppable
You will need to first choose which of the 22″ wood to be the “front” of your rig.That’s where the motherboard USB slots will face, to the front.The 2 middle pieces are the 20.5″ pieces that will go where your motherboards screw slots go.For me, this was 6″ and 8.5″ from the front 22″ piece.(Just lay your motherboard and find out where the screw holes go, that’s where the middle pieces go.)After that use the 2 8″ pieces for the front 22″ and 2 4.5″ pieces on the other side as shown below.
bitcoin gratis bekommenYou can use the 2 7.5″ pieces for the side of the frame then simply put the last 2 22″ pieces on top to finish off the wooden frame.
bitcoin banker deadTo put the motherboard, use the similar method I used with milk crates here in Step 10, then use zip ties to tie it down.
bitcoin etf march 30
(I screwed holes where the motherboard screw holes go.)For securing power supplies, lay a piece of wood that will go on top of your rig, then screw a hole at the end of the power supplies so you can get zip ties to go through.You can use Add2PSU here to connect the 2 power supplies.I also find it helpful to pre-connect all the PCIe cables before putting the graphic cards on it.Voila, when you are done, be amazed the results you can have under $10 of wood!!!Overall, this took me awhile to master as I am not an expert at wood-making, this is just a hack job that I had to learn so I can build more efficient rigs.But I do see there’s similar frames being sold on eBay for $60-80 and you don’t really need to spend extra money on that, just build it yourself.At first, it took me 4-6 hours to make a wooden frame but now it only takes me 20 minutes!Definitely, wooden frames are the way to go if you plan on making multiple rigs as they are much more efficient than milk crates and also very easy to work on your rig when something goes wrong (such as swapping graphic cards/risers).