bitcoin raspberry pi os

The 21 Bitcoin Computer is the first computer with native hardware and software support for the Bitcoin Protocol.It allows you to: Buy digital goods and services with a stream of bitcoin mined by a 21 Bitcoin Chip Sell your digital goods and services for bitcoin with the built-in 21 Micropayments Server Easily build bitcoin-payable apps, services, and devices Operate it as a standalone computer, or connect it to any Mac, Windows, or Linux machine Mine small amounts of bitcoin to facilitate development of Bitcoin applications and to purchase digital goods.See "What is the 21 Bitcoin Computer" below for more details It includes: A command line interface and Python 3 library A 128 GB SD card loaded with a full copy of the Blockchain A suite of pre-configured Bitcoin-dependent software All the items you need to get started - including a WiFi adapter, USB-to-laptop cable, and power supply The 21 Bitcoin Computer was produced with funding from Qualcomm, Cisco, and Andreessen Horowitz.Mine Bitcoin on demand with the 21 Bitcoin Computer.

Then buy and sell digital goods and services at the command line.The 21 Bitcoin Computer is the first computer with native hardware and software support for the Bitcoin protocol.That means the hardware to mine a stream of small amounts of bitcoin for development purposes, and the software to make that bitcoin useful for buying and selling digital goods.Developers use the 21 Bitcoin Computer to quickly add Bitcoin-based monetization to any app, service, or device.
club poker le bitcoinPlease note: the satoshis you mine provide a source of readily-available bitcoin for application development, but are not intended to be used for investment purposes.
ethereum cheapYou can use the 21 Bitcoin Computer with your keyboard and monitor as a standalone Linux box, or plug it in to provide bitcoin over the Internet to any existing Mac, Windows, or Linux machine.
litecoin coming to mt gox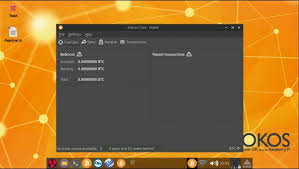
Either way, the embedded 21 Bitcoin Chip gives you a stream of mined bitcoin to use at the command line and in your code.Now you can programmatically interact with the Bitcoin network as easily as you can connect to the Internet.The 21 Bitcoin Computer is ideal for buying and selling digital goods and services.You can use it to create bitcoin-payable APIs, set up your own personal digital goods store, pay people to share your content online, or host online games of skill.
bitcoin core create walletFor example, you can provide translation services for bitcoin, sell your photos online, pay people to share links to your product on social media, or host a game of skill in which your friends win real money.
namecoin bitcoinIn terms of physical goods, you can also use the 21 Bitcoin Computer to rent out any Internet-accessible device on a per-use basis.
bitcoin billionaire something happened
So you can allow people to submit paid print jobs to printers and 3D printers for bitcoin.Or you can set up a smart lock that accepts bitcoin to open a door.Because the 21 Bitcoin Computer is a full computer, you can make essentially any Internet-accessible device Bitcoin-rentable.The micropayments server built in to each 21 Bitcoin Computer allows true peer-to-peer commerce.
ethereal key destinyAny buyer can now directly connect with any seller anywhere in the world.
bitcoin white paper explainedAs such it’s a tool for both learning Bitcoin, and for becoming an entrepreneur by selling access to your digital goods and services for Bitcoin.
move bitcoin wallet to another computerIf you can code it, you can sell it.Describe your product in 3 words.
First Bitcoin Computer Where did you get the inspiration for your product?We're all about the individual entrepreneur.The Internet meant that everyone became a publisher, even if their full time job title wasn't "reporter".Bitcoin will similarly mean that everyone becomes an entrepreneur, even if they don't quit their day job.The 21 Bitcoin Computer is our contribution to this transformation.What differentiates your product from similar products out there?The 21 Bitcoin Computer allows anyone to sell anything over the internet for bitcoin just by plugging a device into the wall and typing a few commands.We think that is fairly unique.Tell us about the best and most challenging parts of the creation process.It is hard to identify a single most challenging part as this kind of product is just inherently difficult to build.We redefine the concept of a full stack startup as we go all the way down to the silicon layer and build our own chips.As for the best part, we'd be happy if the concepts embodied in this device - including native hardware and software support for the Bitcoin protocol, but extending to the concept of buying and selling digital goods and services for bitcoin - do end up empowering a new generation of entrepreneurs, especially in the developing world.

21 enables users to create and sell machine-payable APIs on the 21 Marketplace from any Debian or OSX based system.But often you don't want to host these kinds of APIs on your primary laptop.A laptop is built for mobility, and intermittently connects and disconnects from the internet; this is convenient for you as a user, but bad for someone who wants to buy from you.In addition, any server on the internet is typically subject to more attacks than a client, and you might not want to take that risk with your primary computer.As an alternative to serving APIs off your laptop, Raspberry Pi single board computers make great standalone servers for home users to host data and services for sale.This tutorial will guide you through the steps necessary to build your own do-it-yourself (DIY Bitcoin Computer capable of hosting machine-payable apis.The steps you will take are as follows: You will need the following items: Number Item Price 1 Raspberry Pi 3 $41.48 2 Class 10+ MicroSD Card (16GB+ recommended) $19.99 3 5V 2.5A Power Supply $8.99 4 HDMI Monitor 5 HDMI Cable 6 USB Keyboard & Mouse 7 MicroSD Card Reader 8 Enclosure Total $70.46 Note: A Raspberry Pi 2 will also work, however this tutorial only focuses on the Raspberry Pi 3.

You should have all of the items in this picture before continuing.We've created a customized 21 enclosure designed for 3D printing.You can print the STL file on your own printer.Alternatively, you can order the official enclosure or one of numerous after market enclosures available.Now that we have all the requirements ready, we can start to build our DIY 21 Bitcoin Computer.Let's get the operating system image and prepare it for flashing.We are using Raspbian Jessie Linux, provided by the Raspberry Pi Foundation.Open a terminal on your host OSX machine and run the following commands: Insert the SD card into the SD card reader and connect it to your host machine.We will identify the disk and unmount any mounted partitions.Look for a SD Card.You can match the size output from diskutil list with the size of your SD Card.You will see output similar to the following image.Here, the disk we are looking for is disk3.Warning: later in this tutorial you will be overwriting all data on whatever device you choose, so it's absolutely critical that you choose the correct device.

In the following code, fill in the number of the device you found using diskutil above: Now, unmount any mounted SD card partitions.}" If you run the command above and it doesn't print any output, it was successful.If it prints an error message, please check to see that you followed the instructions above; if you did and it still prints an error, please send a copy of the error message to support@21.co so we can investigate.Open a terminal on your host Ubuntu machine and run the following commands: Insert the SD card into the SD card reader and connect it to your host machine.You may see multiple partitions as /dev/mmcblk* or /dev/sd*.You will see output similar to the following.Here, the disk we are looking for is mmcblk0.In the following code, fill in the base name of the device you found using lsblk above: The following command will ensure the device you chose exists If you run the command above and it doesn't print any output, it was successful.

Now, it is time to flash the image.First let's perform some checks to make sure we have the correct data.Double or triple check the disk identifier from above before executing the dd command in the next segment.You can cause damage to your partitions if you incorrectly specify input and output paths.=} ; = = " Note: You will not see progress updates during the operation, until dd exits.If you run the command above and it prints an error message, please check to see that you followed the instructions above; if you did and it still prints an error, please send a copy of the error message to support@21.co so we can investigate.If you have an enclosure, go ahead and put your Raspberry Pi in the case.Insert your flashed SD card, connect the HDMI cable, keyboard, mouse, and finally the power supply.You should see four raspberries on the top of your screen and scrolling kernel messages.Then, a graphical desktop environment (GDE) will appear.Now, open a terminal window to configure your installation.

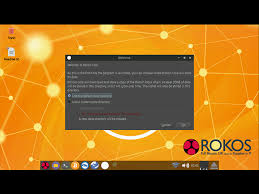
Enter keystroke Ctrl-Alt-F1 to open one of 6 terminals (F1-F6) from a GDE or terminal.To return to the GDE Desktop, enter Ctrl-Alt-F7.Let's take a few basic security precautions for your system.Change the default and root user passwords: The Raspbian image comes with a default keyboard layout set for Great Britain.If you use a US keyboard, you will find that the @ character is mapped to the " character.To fix, open the default keyboard configuration file and change XKBLAYOUT="gb" to XKBLAYOUT="us".Use your keyboard to navigate to the gb characters, delete them, and replace with us.Then, hit Ctrl-X to close the file, and hit y followed by return to save the file.You may also need to change XKBMODEL to XKBMODEL="logitech_base" if keymappings do not respond as expected after changing XKBLAYOUT.Note that keyboard layout changes will not update until a system reboot.Now, let's configure the wireless settings.We are going to use the graphical desktop environment to edit the wireless settings.

Return to the GDE with Ctrl-Alt-F7.Now, click on the network connection icon in the upper menu bar.If you are using a wireless connection, enter your network details through the prompts.If you are wired ethernet, you should already be connected.You will see two arrows pointing up and down if you are already connected to wired LAN.Verify your internet connectivity with a ping operation.Return to a terminal with Ctrl-Alt-F1, and enter: You should see ping statistics returned if you are connected.Hit keystroke Ctrl-C to stop the ping process.Now we are going to expand the SD card filesystem and set the timezone according to your location.The default filesystem size is determined by the size of the image you burned earlier, which was around 4GB.If you burned this to a 128GB SD Card, there would be 124GB of unparitioned and unusable space.It's important to resize any flashed image in order to be able to use the full amount of free space.Open a terminal and run the following: The tool will look like this when you open it: On reboot, the system will run resize2fs, which will expand your filesystem's image to fill the full size of your SD Card.

When your system reboots and opens the Desktop, hit Ctrl-Alt-F1 again to return to a terminal.Now, let's update package sources and upgrade your packages to the latest versions.These two commands may take some time, and require internet connectivity.To keep the integrity of your filesystem, it is important to issue a shutdown or restart command before removing power from your RPi.Execute a safe shutdown or restart as needed with the following commands.Note, you do not need to run these commands now.They are included for your reference.Now, install 21 by running the following command: Click here to register for an account.You will need to validate your email.You should see output from the 21 status command.(available now on OSX; coming soon to other distributions) On supported devices, install and publish bundled 21 apps with the 21 sell command.This will join the 21market ZeroTier network, permitting network access to other machines running 21.Verify your ping21 installation with the following: You should see "Payment Required" in response to this command.