mine litecoin for free
Download this video for viewing in HD on your smartphone or computer.Click Here to Download High-Quality HD video to your Smartphone or Computer.For those of you who want to run your mining rig efficiently, you may want to think about using a Linux OS instead of Windows.Linux OS offers more stable and efficient management of your new Litecoin mining rig.UPDATE: I have a new USB Flash drive image you can download and flash, which has everything on this page, so go here.There’s several advantages to using Linux over Windows: So, what kind of Linux should you install?Probably the most popular consumer Linux platform is Ubuntu.You can use any Linux distro but make sure the Linux distro you use has some type of GUI otherwise you won’t be able to install drivers.So, let me show you how to install and optimize your Ubuntu for Litecoin Mining Rig from scratch.For this tutorial, I am going to assume you are using a blank hard disk or USB flash drive.You will need to download the latest version of Ubuntu image for your computer.

I downloaded 64-bit image and most of you probably want that unless you are using a really old computer.Download Ubuntu 64-bit image here Next, you will need a USB flash drive (use 2GB or higher) and install the image.To make a bootable Ubuntu USB, you can use PenDriveLinux program.It’s very easy to use, just download and run.Then point the image to your downloaded Ubuntu image and also to your USB flash drive.
bitcoin miner s9Power on your new Litecoin Mining Rig, then go into the BIOS settings during boot.
bitcoin irc freenodeUsually it’s either the Del button or F10 button to get into the BIOS settings.
bitcoin wealth distributionOnce in your BIOS settings, make sure the SATA type is set to “AHCI” if using a hard disk.
bitcoin payday loans
On some Gigabyte motherboards, you may see something like “IOMMU Controller” setting.If you do see this setting, make sure it’s ENABLED as if you don’t enable it, your Ubuntu flash drive will not boot correctly and give you an error.(It took me 3 hours to figure this out.)There should be a setting on your BIOS that you can set your PC to power back on whenever there’s a power loss.
ethereum chrome appFor me, it’s under “AC BACK”.
best bitcoin mining pool 2012You should enable this so your computer will power itself back up automatically in case of power outage so your machine doesn’t stop mining when you are not home.
bitcoin creator deathOnce done, “Save and Exit”.
ethereum skype group
Next go ahead and plug in your new Ubuntu USB flash drive into your computer and boot.For my motherboard, I can press F12 button to change the boot drive and most motherboard should have a similar boot option in the boot screen.Do that and choose your USB flash drive so your computer will boot into the USB flash drive.Once booted to USB flash drive, choose “Install Ubuntu” when you see the boot options.
poker con bitcoinNext, choose “Erase disk and install Ubuntu” if using a hard disk.If you want to install on a USB flash drive, connect “another” USB flash drive (that’s 8GB or higher) onto your computer then choose “Something else”.For partition, I recommend setting around 7.5GB to mount point “/” and 0.5GB to swap.If using a larger USB flash drive, just make sure your “/” mount point is larger than 7.5GB.You can use less but your system may slow down as Ubuntu system installation comes to near 5.6GB.

When done installing, pull the bootable USB flash drive out.If using hard disk, simply reboot.If using USB flash drive, leave the 2nd USB flash drive on your computer.This is what you will be using as permanent disk drive for your new Litecoin rig.Once rebooted into your brand, new Ubuntu OS, pat yourself on the back.You just learned how to install Ubuntu on a brand, new PC!Next, open up a terminal then type: This will update all the Ubuntu files to the latest before we install AMD Radeon linux drivers.Once done, type “sudo reboot” to reboot your computer.Next download latest AMD Catalyst 14.1 drivers.download the latest AMD Catalyst 13.1 Linux drivers.This AMD Catalyst Linux driver supports most AMD Radeon graphic cards including HD7950, HD7970, R9 280X, R9 290, R9 290X, and many more.For Ubuntu 64-bit: sudo apt-get install build-essential cdbs dh-make dkms execstack dh-modaliases linux-headers-generic fakeroot libqtgui4 lib32gcc1 For Ubuntu 32-bit: sudo apt-get install build-essential cdbs dh-make dkms execstack dh-modaliases linux-headers-generic fakeroot libqtgui4 This will basically install some of the essential software we need to install the AMD Radeon drivers.

Once that’s done type: n --buildpkg Ubuntu/raring This is the easiest method to install AMD Radeon drivers and basically we are using Ubuntu to make it install the drivers.This will install the Radeon drivers.sudo aticonfig --initial -f --adapter=all This will set your GUI to use the new AMD Radeon graphic cards, it will work for single and multi graphic cards but if you don’t use “–adapter=all”, your Ubuntu may only use 1 or 2 graphic cards for mining even though you have 3 to 6.(Do not use –adapter=all setting for Crossfire, also MAKE SURE YOUR NOT USING CROSSFIRE in the first place!!!For Litecoin mining, you do not need crossfire, you get much better performance without it.So, unplug the crossfire cable!!!)After that, reboot your system by typing “sudo reboot”.Your Ubuntu should have rebooted.If you have booted fine and don’t notice anything, congratulations!You’ve just learned how to install AMD Radeon drivers on Ubuntu system.What you did from Step 1 thru Step 15, you can now install a full Ubuntu OS with AMD Radeon drivers on any computer!

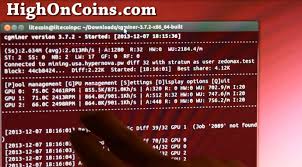
Next, you need to download CGMiner program, which is the Litecoin mining program.You need to get CGMiner v3.7.2, this is the latest version that supports Scrypt mining, which is required for Litecoin mining.Download CGMiner 3.7.2 64-bit here Step 18.Next to verify your AMD Radeon video cards are being recognized by CGMiner, type: If you see all of your graphic cards listed here, you are good to go!For my rig, I saw 3 graphic cards here, all of my 3 R9 290X graphic cards recognized, YES!!!To actually mine Litecoins, you will want to join a mining pool.You can join any Litecoin Pool here.Many Litecoin pools may go down and not managed properly so you may want to be careful which pool you join.I’ve found one really solid Litecoin pools (that never seem to go down), try Hypernova if you have no idea which one to choose.Once signed into your new Litecoin mining pool, hit the “Account” menu button.This should get you to a menu where you can add new “workers”.Make a new worker, and set a password.

Next, open up a text editor and type: export DISPLAY=:0 export GPU_MAX_ALLOC_PERCENT=100 export GPU_USE_SYNC_OBJECTS=1 ./cgminer –scrypt -o http://mining.usa.hypernova.pw:3333 -u zedomax.test -p123123 You can replace “http://mining.usa.hypernova.pw:3333” with your Litecoin pool address (you can usually find this under Help menu at your Litecoin pool) and also replace “zedomax.test” with your “username.workername” and also replace “123123” with your password.Once done, save this as “minenow.sh” in your cgminer-3.7.2-x86_64-built directory.Next, type in your terminal “sh minenow.sh” to run your new script.This will start running the CGMiner program.You should see a following screen with your graphic cards listed as GPU0, GPU1, etc…etc… Congratulations!You have started making virtual currency!Now, this is just the tip of the iceburg as you will need to optimize the parameters to overclock your GPU and memory to get most of out it.

You can now go into your account in your Litecoin Pool and see that the Kh/s going up!To optimize your CGMiner, you will need to play with the GPU so hit “G”.You should see your current “Engine Clock” and “Memory Clock” speeds.Engine clock is basically your GPU and Memory clock is your memory.Start playing with the memory first.To change memory clock, hit “M” then overclock slowly.So if at 1250Mhz, try going to 1300Mhz.Let the program sit for about 30 seconds and see if your hashrate is going up for that particular GPU.If you changed clock on GPU0, you should watch GPU0 hash rates.)Keep changing it up until your hashrate doesn’t go up anymore.B. Next, do the same thing with your Engine clock.Hit “E” then start overclocking it slowly around 50Mhz step at a time.So if you are at 891Mhz, try going to 940Mhz next and so on until you find the maximum rate you can go.C, Next go back to step A and B until you can maximize your hashrate.Also watch the temperature, it shouldn’t go above 90 degrees celcius at any time.

If it does, you are overclocking too much or your GPUs are not getting enough cooling (such as in a PC Case).You may want to consider having more space between your GPUs or just make a crate-based Litecoin rig.After tweaking and playing with the values, I was able to achieve around 2.6Mh/s for my 3 R9 290X graphic cards in a PC Case.Now, a lot of factors determine how much you can overclock, it will first depend on your setup (where you have a PC Case or open-air type like a milk crate) and also your graphic cards.For the latest high-end R9 290X graphic cards, I found the following parameters to work best: -I 20 -g 1 -w 512 --thread-concurrency 8192 For the latest lower-end HD 7950 or 7970 graphic cards, I found the following parameters to work best: -I 13 -g 2 -w 256 --thread-concurrency 31792 These are parameters that you need to put in your “minenow.sh” file.-I is for intensity.You may want to play with this value first but in general, if you have 7950/7970 set it to 13 and if you have R9 290 or 290X, set it to 20.

Similarly, you need to find the correct values for “-g”, “-w” and “–thread-concurrency”.You should try the values above though, they should work well for most.Additionally, add these values in: --gpu-powertune 20 --temp-cutoff 99 --temp-overheat 95 --temp-target 90 --gpu-fan 40-100 --auto-fan “–gpu-powertune will allow your GPU to automatically supply more voltage when overclocking, 20 should be good for all Radeon cards.The other temperature stuff will make sure your fan runs to cool down your cards.If using PC Case, this will help your fan run faster as your temperature will go beyond 90 degrees.For open-air crate, you probably don’t need it as your temperature should not go over 80 degrees in most cases.For adding the Engine and Memory clock values you got in Step 27, use the following: “–gpu-engine 950 –gpu-memclock 1450” This will set your Engine clock to 950Mhz and Memory clock to 1450Mhz.Put the values in here that worked best for you.

Once you have found the right setup, you will have an optimzed script such as this one which does 2.6Mh/s for my 3 Radeon R9 290X graphic cards: cgminer --scrypt -o stratum+tcp://mining.usa.hypernova.pw:3333 -u zedomax.test -p 123123123 -I 20 -w 512 --thread-concurrency=32765 --temp-cutoff 99 --temp-overheat 95 --temp-target 90 --gpu-fan 40-100 --auto-fan --gpu-engine 920 --gpu-memclock 1500 --gpu-powertune 20 -g 1 --lookup-gap 2 Here’s also my setup for 3 HD 7970 graphic cards which does 2.2Mh/s: ./cgminer --scrypt -o http://mining.usa.hypernova.pw:3333 -u zedomax.test -p q123123 -I 13 -g 2 -w 256 --thread-concurrency 8192 --gpu-powertune 20 --temp-cutoff 99 --temp-overheat 95 --temp-target 90 --gpu-fan 40-100 --auto-fan --gpu-engine 1014 --gpu-memclock 1718 I am also updating a list of CGMiner.conf with my optimized settings here, this should give you a great place to start with.Lastly but not least, check out parameters used by other Litecoin miners here.Well, that’s about it folks.