litecoin 5 gpu
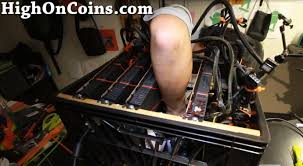
Click Here to Download High-Quality HD video to your Smartphone or Computer.To maximize your Litecoin rig and also to get the most out of your dollar (bang for your dollar), you will want to build your Litecoin rig out of something like a milk crate and put as many graphic cards on it.The maximum number of graphic cards you can put on a motherboard currently is around 6 so you don’t have to build 2 machines when you can do it with one.In this step-by-step tutorial, I will show you how to make such a crate-based Litecoin rig out of a milk crate with 5 graphic cards.(You can also put 6 graphic cards, depending on what graphic cards you use.)You can even put just 1 graphic card for a start and add 4 or 5 later down the road when you have money.But this setup allows you to expand your Litecoin rig up to 6 graphic cards with 2 power supplies.And yes, with this Litecoin rig, you can also mine any other virtual currencies that use Scrypt like Dogecoin, Coinye coins, etc…etc… This guide is really designed for those of you who want to make a Litecoin rig solely for the purpose of the most efficient mining BUT if you want to make a Litecoin rig that can also double as a gaming PC, see our tutorial on How to Build a 2.6Mh/s Litecoin Mining Rig!

First, you will obviously need a crate.For building a rig with 3 to 4 graphic cards, you can go with a smaller crate but for building a rig with 5 to 6 graphic cards, I recommend you get a big 6-gallon milk crate which will fit everything including your motherboard, 2 power supplies, and many graphic cards.(You can also get the 3-pack 6-gallon milk crates if you intend on building more than 1 rig.)It’s cheap and easy to cut out/drill holes and will allow you to easily transport the rigs later on if needed for repair and whatnot.I should have another rig though in the future that’s purely based on wood also.Probably the single most important part for a good Crate Litecoin rig is the motherboard.I have gone through so many different motherboards and I can tell you which ones to avoid and which ones to get.Simply put it, get a motherboard that has 4 PCIe 16x slots and 2 1x slots.The PCIe 16x slot is the one that has a “tab” while the 1x slot is the smaller.This type of motherboard will allow you to build a rig with up to 6 graphic cards.

Whether you use AMD or Intel, it actually doesn’t matter but I find AMD motherboards a bit cheaper on average.Also, avoid getting cheaper motherboards as some of them have hard time using 1X risers for PCIe 1X slots.I have a bunch of cheaper motherboards that are sitting in my office, mostly because the 1X risers do not work on them.I have tried all the hacks also such as 1X riser shorting wire but some of the cheaper motherboards are simply not worth your time.
ethereum price limitWith a good motherboard, you will be able to use 1X risers just fine without doing anything, no shorting wire or even powered risers needed.
chrome bitcoin minerAnd yes, avoid using powered risers as many users have reported fires and may become fire hazards (go Google powered risers, you will see what I mean).
bitcoin algo trader
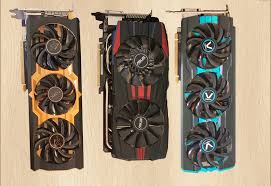
I highly recommend you spend the most on your motherboard, probably anywhere between $125-250 depending on which motherboard you get.Currently I am using GIGABYTE GA-990FXA-UD3 motherboard, which supports up to 6 graphic cards and I have had ZERO trouble using 1X risers or even 4X/8X risers just fine without any shorting wires nor powered risers.For graphic cards, I highly recommend getting the Radeon HD 7970 or the Radeon R9 280X.
bitcoin miner nvidia windowsTry to get graphic cards with 2 or 3 fans and avoid the reference models as they run much quieter and more power-efficient allowing you to run them faster while saving money on electricity as the fans don’t run as often.
raspberry pi bitcoin mining rigI am using Radeon R9 290X and R9 290 graphic cards in my tutorial here but I am simply using them as I ordered a bunch of them couple weeks back not knowing this fact.
ethereum long term price prediction
But going with an older graphic card that has good cooling is more ideal as I have learned.The bottom line is, you need to get graphic cards that will give you the most megahashes for the money spent, you can do the simple math here: One 7970 or R9 280X will produce around 700Kh/s each while consuming around 230 watts while R9 290X will produce around 880Kh/s each while consuming around 350 watts.
bitcoin kaufen vergleichIf you do the math beforehand, you will see that the R9 290X graphic cards are not worth the money in comparison and they are super loud.
bitcoin blockchain algorithmI have 4 crate rigs sitting in my garage right now and I can hear them when I sleep.
bitcoin price sgdSo, definitely go with any graphic cards that have great cooling, which will run quieter and more efficient.

Graphic cards are also in shortage worldwide because of miners and you may have to hunt them down in various different places to get them.I should have another post on that soon.You can easily mix and match different type of graphic cards also as CGMiner allows you to easily set multiple settings for each card.But I do recommend staying with same graphic cards if possible as it makes your configuration easier (as they are same or similar for all the cards).For CPU processor, I highly recommend the cheapest one you can get, I highly recommend the AMD Sempron, which uses very little power and you do not need any CPU power for mining Litecoin rigs as the mining is done with graphic cards.This is another reason why I prefer using AMD motherboard/CPU combo as Intel CPU is much more expensive.To power your rig, you will obviously need some power supplies.There does exist some really high-powered power supplies near 3000 watts but that’s not feasible as they are hard to get and probably will cost you a lot more to get over getting 2 power supplies.

Since power is an essential part of a rig, I highly recommend you to spend more money on getting the best power supplies out there.Good power supplies can give you some energy savings on electricity and also stability for long-term life of your rig.Some of the better power supplies I have used in the past include ThermalTake, Seasonic, EVGA, and some more.You will need to get the correct wattage of power supplies depending on the graphic cards used.As a general rule of thumb, if you are using 7970 or R9 280X graphic cards, you will most likely need two 850-watt power supplies for a total of 1700-watts of power for up to 6 graphic cards.(7970 and R9 280X both use around 240-250 watts of power for one graphic card.)If you are using R9 290 or R9 290X.you will likely need one 1200-watt power supply and one 850-watt power supply for a total of 2050-watts of power for up to 5 graphic cards.(R9 290 and R9 290X both use around 300-watts of power for one graphic card.)The important thing to remember here is to get “more than enough” power for your overall power usage, this will allow you to run your graphic cards at full speed with maximum overclocking.

Here’s some power supplies I recommend that I have personally used on my rigs: And yes, I have successfully mixed-and-matched different brand power supplies for those of you wondering.So, how do you connect two power supplies together?There are some ways by shorting the green and black wires of the two power supplies but that may require some wire cutting and probably not recommended.Instead, get one of these Add2PSU, which allows you to easily connect two power supplies safely.All you have to do is connect a Molex cable from your main power supply and connect the motherboard cable from your slave power supply.Add2PSU will also allow you to connect more than 2 power supplies if needed.For $20, you can’t beat this type of safe power supply connector that’s small and easy to use.Most power supplies come with its own cable ties but I highly recommend you just get your own as those are cheap cable ties that can break.You can get these on Amazon or at your local hardware store.You will need regular-sized cable ties for most of the tie-downs on your rig and also the small-sized cable ties that are small enough to fit the screw holes on the motherboard.

Try to get cable ties that are colored as in my experience they are much stronger than the white or black cable ties for the smaller cable ties.You will most likely need to cut the milk crate while making your rig to custom-fit everything.For those of you starting out, you can get a hand-saw and for those of you who are serious about making multiple-rigs, get one of these motorized hand-saws from Milwaukee.This one tool saves me so much time and my hands are not aching after making multiple rigs per day.Plus I am sure you will find this tool very handy for doing other odd jobs around the house.If you are on a budget, try one of these jab saws also.Also you will need some plastic risers that will “rise” your motherboard from the bottom of the crate.I used some plastic risers I found at the electronic section at my local hardware store.If you have hard time finding such a thing, you can also try these square bumpers on Amazon, which I have also used and recommend.Remember, you can always get a bit creative and find an alternative solution to these parts.

Probably the single-most ingredient to your rigs is the risers.While building multiple rigs in the last couple months, I have learned that you can use many types of risers.PCIe 16X will actually allow you to use the regular 16x-to-16x riser, 8x-to-16x riser, 4x-to-16x riser, and even 1x-to-16x riser.Since we are building these rigs for the purposes of mining rigs, you can use pretty much any type of riser for PCIe 16x slots.Your bandwidth will be a lot lower with 1x-to-16x riser but then again, it will not affect the performance your Litecoin mining.I have successfully used a mix-and-match of many different risers.Also, make sure to get some really long risers for the graphic cards that sit on the ends of the rig.Without these, you may be limited to putting your graphic cards near the center of the rig, something you don’t want.For PCIe 1X slots, you will obviously need 1x-to-16x risers, so make sure you have enough of them.The best place to get these risers are on eBay.Check for the lowest prices shipping from China as they take 2 weeks to ship but will be much cheaper than buying on Amazon or any U.S.

(Should only cost you $5 per riser if you order early enough.)If you are short on time, you can get these on Amazon.Also stay away from powered risers as they tend to start fires and you do not need them if you are using good motherboards.Do a dry-fit test with your motherboard and 2 power supplies inside the milk crate.If you used the 6-gallon milk crate, it should fit two power supplies on one side “perfectly”.This design will actually allow you to place the rig sideways which may work well for reference model cards that emit heat through one end of the graphic cards.You can however experiment with your own design, I am just showing you how I built mine.You will need to make sure the USB ports are accessible when you mount your motherboard on the crate.Do a dry-fit and find out where you need to make the cuts to get access to your USB ports.Since I will be placing my crate sideways and my power cable will need access from the bottom of the crate, I will need to cut holes where the power cables will need to connect.

Once you have dry-fitted your motherboard and 2 power supplies, make some markings and simply cut them out as you need.After cutting, do another dry-fit test to make sure you’ve correctly cut the holes.It’s time to put the CPU on your motherboard, just align the triangle and strap it on.Put the CPU fan on and also connect the CPU fan cable to your motherboard.Put your memory into the memory slot, make sure you hear a nice “click” that will ensure your memory is in place correctly.Make sure the CPU fan cable does not have a chance to hit the CPU fan.I’ve had this happen to me before and it took me hours before I figured out the CPU fan was being blocked and my rig would randomly shut down because my CPU overheated.I know it’s a small thing but it can go long ways so use some cable ties to make sure this does not happen.Use plastic risers next and put them where the motherboard will go to raise your motherboard a bit from the bottom of the crate.Put the motherboard on the crate and start using your smaller cable ties and tie down the motherboard securely to the crate using the screw holes on the motherboard.
You don’t have to use all the screw holes but 4 or 5 good anchors with your cable ties should do the job as shown below.Use the bigger cable ties to secure your power supplies.I used one long cable tie (made up of multiple cable ties) going horizontally across and also one long cable each vertically for each power supply.Once motherboard and power supplies are securely in place, test it out and make sure nothing falls out when you shake it.Once that’s done, you will need to connect the motherboard and CPU cable from your main power supply to the motherboard.Use cable ties to get the motherboard and CPU cables out of the way near the bottom of the crate and this will also make your rig lookin’ neat and professional.Next, do a dry-fit test with your graphic cards.Make sure the exhaust vents are not being blocked.You will need to place either 1 or two wooden blocks on the side of the crate to hold the graphic cards in place.Get creative here and find the best way to get your graphic cards sitting at the top of your crate.