ethereum voting example
In my previous post, I explained the high level architecture of Ethereum platform comparing it to a web application.As a developer, the best way to learn any new technology is by diving in and building toy applications.In this post, let’s build a simple ‘Hello World!’application which is a Voting application.The application is extremely simple, all it does is initialize a set of contestants, let anyone vote for the candidates and display the total votes received by each candidate.The goal is not to just code an application but to learn the process of compiling, deploying and interacting with it.I have deliberately avoided using any dapp frameworks to build this application because the frameworks abstract away lot of the details and you fail to understand the internals of the system.Also, when you do use a framework, you will have more appreciation for all the heavy lifting the framework does for you!In lot of ways, this article is a continuation of the previous post.If you are new to the world of Ethereum, I recommend reading it before continuing.The goal of this exercise is to:The entire application set up and build was done on a fresh installation of ubuntu 16.04 xenial.

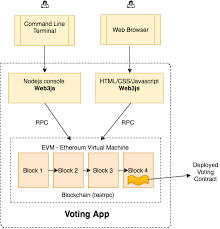
I have set up and tested the application on macos as well.This is how I would visualize this application we are going to build.Instead of developing the app against the live blockchain, we will use an in- memory blockchain (think of it as a blockchain simulator) called testrpc.In Part 2 of the tutorial, we will interact with the real blockchain.Below are the steps to install testrpc, web3js and start the test blockchain on a linux operating system.The exact same instructions work on macos as well.For windows, you can follow the instructions here (Thanks Prateesh!).Notice that the testrpc creates 10 test accounts to play with automatically.These accounts come preloaded with 100 (fake) ethers.We are going to use the solidity programming language to write our contract.If you are familiar with object oriented programming, learning to write solidity contracts should be a breeze.We will write a contract (think of contract as a class in your favorite OOP language) called Voting with a constructor which initializes an array of candidates.

We will write 2 methods, one to return the total votes a candidate has received and another method to increment vote count for a candidate.Note: The constructor is invoked once and only once when you deploy the contract to the blockchain.Unlike in the web world where every deploy of your code overwrites the old code, deployed code in the blockchain is immutable.i.e, If you update your contract and deploy again, the old contract will still be in the blockchain untouched along with all the data stored in it, the new deployment will create a new instance of the contract.Below is the voting contract code with inline comment explanation:Copy the above code to a file named Voting.sol in the hello_world_voting directory.Now let’s compile the code and deploy it to testrpc blockchain.Remember from the previous article, web3js is a library which lets you interact with the blockchain through RPC.We will use that library within a node console to compile, deploy our application and interact with the blockchain.First, run the ‘node’ command in your terminal to get in to the node console and initialize the web3 object.

All the code snippets below need to be typed in the node console.To make sure web3 object is initialized and can communicate with the blockchain, let’s query all the accounts in the blockchain.You should see a result like below:To compile the contract, load the code from Voting.sol in to a string variable and compile it.When you compile the code successfully and print the ‘contract’ object (just type contract in the node console to see the contents), there are two important fields you will notice which are important to understand:Let’s now deploy the contract.
litecoin mining profitabilityYou first create a contract object (VotingContract below) which is used to deploy and initiate contracts in the blockchain.VotingContract.new above deploys the contract to the blockchain.
diy bitcoin mining case
The first argument is an array of candidates who are competing in the election which is pretty straightforward.Let’s see what are all in the hash in the second argument:We have now deployed the contract and have an instance of the contract (variable contractInstance above) which we can use to interact with the contract.There are hundreds of thousands of contracts deployed on the blockchain.
gegen bitcoin wettenSo, how do you identify your contract in that blockchain?
bitcoin bip 21When you have to interact with your contract, you need this deployed address and abi definition we talked about earlier.Try the above commands in your node console and you should see the vote count increment.
litecoin mining hardware asicEvery time you vote for a candidate, you get back a transaction id: Example: ‘0xdedc7ae544c3dde74ab5a0b07422c5a51b5240603d31074f5b75c0ebc786bf53’ above).
ethereum vendorsThis transaction id is the proof that this transaction occurred and you can refer back to this at any time in the future.This transaction is immutable.This immutability is one of the big advantages of blockchains such as Ethereum.In future tutorials, we will build applications leveraging this immutability.Now that most of the work is done, all we have to do now is create a simple html file with candidate names and invoke the voting commands (which we already tried and tested in the nodejs console) in a js file.Below you can find the html code and the js file.Drop both of them in the hello_world_voting directory and open the index.html in your browser.If you remember, we said earlier we will need the abi and the address to interact with any contract.You can see above in the index.js file how they are used to interact with the contract.This is what you should see when you open the index.html file in your browser.If you are able to enter the candidate name in the text box and vote and see the vote count increment, you have successfully created your first application!