ethereum miner debian

Basic Ethereum Mining Guide It contains everything!#1 The Ethereum Wallet PC, Phone, ... Before we get started with the mining of Ethereum coins we need an Ethereum Adress that will be used for Mining and Transactions later on in the guide.The First Wallet is from Freewallet and supports Android/IOS Phones and has an easy interface for beginners.The Second Wallet is from Etherwall and supports Windows/OS/Linux and also has an easy interface.#2 Is your Graphics Card Compatible for Mining?Nvidia/AMD only To go on step 2 we need to see if your Graphics Card (GPU) is able to Mine Ethereum.So here is a list of all GPU's Supported for Mining: (Some Laptop cards are supported too like GTX 970m) NVIDIA CARDS:9xx cards in Windows 7 x64: Driver 368.81 9xx cards in Windows 10 x64: Driver 352.xx 10xx cards in Windows 7 x64: just use latest 10xx cards in Windows 10 x64: just use latest AMD CARDS:7xxx, 2xx and 3xx, 2GB or moreR7 SeriesR9 SeriesRX Series #3 Opperating System Windows/OS/Linux/Ubuntu/EthOS/GenEthOs So now that you know your GPU is compatible for mining we will go to the Opperating System that you will need to start mining.

There are many opperating systems available and i will cover them all and what they are capable of in the list below so pick out your needs: Windows 7: 4 GPU'sWindows 8: 5 GPU'sWindows 10: 6+ GPU'smacOS: No GPU'sLinux: 6+ GPU'sUbuntu: 6+ GPU'sEthOS: 6+ GPU'sGenEthOs: 6+ GPU's #4 Extracting Your Miner Claymore Miner Now that you installed your opperating system on your system or miner you will need the software to start mining, you will need your miner from Step #1 and the download link from the miner Here.
bitcoin to reach 10000Make sure you download the miner: WIN or LINUX Buried ETH Claymore v7.3 Miner.rar and extract the miner to your desktop.
johnny london bitcoinThe extracted miner should look like the image shown next to this step.
the ethereum wow
#5 Adjust Your Miner Claymore Miner After Extracting the Miner we need to adjust a file in the miner so that it mines on your adress.To do so we see 2 files called "Start Miner 2GB Cards" and Start Miner 4GB Cards" So the 2GB file is for 2GB GPU's and the 4GB file is for 4GB GPU's and above.Right click the file that is meant for your GPU and click "Edit", Change the Ethereum Wallet Adress to YOUR Adress and change the "YourMiner" to anything you like.Also change to the nearest server by editing the "us1" to "eu1", "eu2", "cn1", "us1", "us2", "asia1".When you changed the Adress, Miner Name and Server you should save the file and you are ready for the next step.. #6 Running Your Miner Claymore Miner Now that your "Start Miner" File has been asjusted to your adress, you should double click it and you will see that it will start to mine Ethereum.
bitcoin las vegas conferenceMake sure your GPU temperatures are not too hot and stable for at least 30 minutes.To check your GPU temperatures you can use something like GPU Temp and you will be safe if you stay under 85 Degrees Celcius!
aeon bitcoin
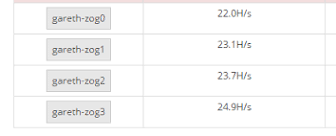
#7 Checking Your Mining Ethermine .If you click that link you should see an adress search bar in the right top corner, fill in your Wallet Adress you created in Step #1 and you can see everything you desire.The payout is set to 1 ETH by default, to change it you will need to go to the "Settings" Tab on your miner page, after you change the payout to your desired amount you will need to save it using your IP adress.
legit bitcoin cloud miningYou can see your IP adress on this link Here.
ripple send bitcoinDownloading the Ethereum-Mist Wallet App How the Term “Wallet” Is Used in This Guide Creating Accounts Introduction Creating Your First Account Changing an Account’s Name Copying Your Account’s Address Creating a Second Account Don’t You Just Love Those Identicons Private Key, Password, Backup Introduction Backup & Restore Password This Is IMPORTANT: Accessing an Account Accounts That Just Show Up When You First Launch the Wallet App If You Already Own Some Ether Getting Your Ether to Show up in the Wallet App If Your Ether Is Held at an Exchange Like Kraken or Poloniex If Your Ether Is Still Stored with Your Presale Wallet If Your Ether Is Already in an Account If You Have Moved Your Ether Offline into Cold Storage If You Currently Do Not Own Any Ether Getting the Ether into Your New Account Sending Ether to Another Account Transaction Fee Transaction List Versions of the Wallet App are available for Linux, Mac OS X, and Windows.
bitcoin miner intel hd 3000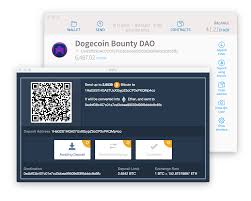
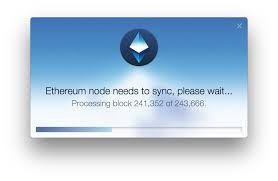
For the Wallet App to work, it will need to connect with a running, fully synced Ethereum node.The Mac, Linux 64Bit and Windows 64Bit versions come with a bundled Ethereum node, the Golang implementation called Geth.As this user guide is targeted at non-technical users who will not want to separately install a Geth node, only these versions with the bundled node are covered in this guide.
buy litecoin rigNote: The Mac OS X and Win 64Bit versions also include Eth, the C++ Ethereum client.However, only Geth is covered here.Downloading the Wallet App involves syncing a full copy of the Ethereum blockchain on your computer, requiring almost 6 GB of disk space as of early January, 2016.As such, be prepared to wait about an hour for the initial syncing process to complete.To download the Wallet App: Note: In this example, I work through the installation of the Win 64Bit version.Select the version you require from the available options on this page.

A blank opening screen with no Accounts.Most Wallet App operations will fail if your node is not fully synced, that is, if your copy of the blockchain is not up-to-date with the network.To check that your copy of the blockchain is up to date: Towards the top of the Wallet Overview screen you will see information relating to the sync status of your node.To check that all is well and that you have the latest block, compare this information with what you see in the Network Stats page.Note: If there is any suggestion that your node has stopped syncing (e.g.zero peers or block number not changing), try restarting the Wallet App.Also, if the blockchain does not download at all, check if your computer’s clock is accurate.Every time you stop and restart the Wallet App, you will have to wait a while as your node downloads and processes the latest blocks and becomes fully synced again.How the Term “Wallet” Is Used in This Guide Consistent usage of terms is something newcomers appreciate as it makes the learning process so much easier.

The term “wallet” can mean different things depending on the context in which it is used.People with a general understanding of Bitcoin will know that “wallet” can refer to a single private key/address pair, as in a Paper Wallet.It can also mean the app in your mobile that manages your coins.Frankly, it gets a little worse with Ethereum.In this guide, the term “wallet” will always be used in a general/generic sense, to mean anything that can hold ether (or other crypto tokens).So, when I say wallet (or Wallet or WALLET), I can be referring to any or all of the following: Paper Wallet, Presale Wallet, a Wallet App, Multisig Wallet, etc. If I mean a specific type of wallet, then I will refer to it by its specific name, like Presale Wallet or Wallet App, for instance.And, as we will see in the next section, Accounts are also wallets.In Ethereum, there are two types of accounts: Externally Owned Accounts and Contract Accounts.We will encounter Contract Accounts in Chapter 2.For now, we’ll work only with Externally Owned Accounts, which we will refer to simply as Accounts throughout this guide.

Accounts can function as wallets, though they can also be used to do things other than just hold ether.In this chapter, we’ll focus on their function as wallets, in which case an Account can be thought of as simply a private key/address pair.Note: Regardless of whether you have any ether, work through the following initial steps.(You will be shown how you can acquire some ether, if you need to, in a later section.)We will assume you are starting with a blank opening screen with no Accounts displayed.Your first Account named Etherbase with zero ether in it.Important Note: There is a very important section on passwords, private keys and backup immediately following these instructions on creating Accounts.Please be sure to read it before you start working with any ether.The first Account you create will by default be named Etherbase.Changing the name of any Account is easy.To change an Account’s name: It will be useful to copy and paste your Account’s address into a text file for easy access.

To copy an Account’s Address: Ethereum Account addresses are in hexadecimal format.They are made up of 40 characters (hexadecimal digits).Additionally, the address may or may not be prefixed with the hexadecimal notation “0x” (zero x).It is generally safer to use the 0x prefix.If you want to read more about the address format, this post is useful.You will need a second Account to follow the exercise later in this chapter.So create one now.Notice that this second Account is named Account 2.(It is possible that your block explorer may not recognize an address until it is funded with some ether from another Account.)Creating Accounts is free; a little rare generosity from the Ethereum protocol :).Most other operations will cost you ether, as you will soon discover.Free or not, I’m sure you appreciate the perils of juggling too many Accounts/wallets.Tip: You may have occasion to quickly grab an Ethereum address.Perhaps someone wants to send you some ether right now.Or, you need an Account to receive REP tokens from Augur.
A quick way to create an Account and get an address is described by Alex van de Sande here.Identicons are not original to this app of course, but the implementation here looks and works great.Each Identicon provides a unique pictorial representation of a unique address.Identicons are not included just for cosmetic reasons.If you are familiar with the identicons of the addresses you work with, then they can help flag an incorrect address entry; the identicon you see will just not match the one you expect.Also, if you type or paste in an address that does not conform to the address format, say you miss out the last character, you will be given ample warning: Every Account like the one you just created, is defined by a pair of keys, a private key and an address (or public key).Every private key/address pair exists as a single keyfile.Keyfiles are found in the keystore subdirectory of your Ethereum node’s data directory.But where is this all-important data directory?(Incidentally, it is a hidden directory by default.)

If you are running the Windows version of the Wallet App, the node’s data directory is located at: (Replace username with the actual name you use.)Linux and Mac users will find the Ethereum node’s data directory in the following locations: Note that the Library, .ethereum and %appdata% directories in Mac, Linux and Windows respectively are all hidden directories.Use whatever method is appropriate for your OS to unhide or search for the contents of these hidden directories.You should see something like this: Inside the keystore subdirectory, you will find one keyfile for each of the Accounts you have created.You must have an Account’s keyfile to be able to send any transaction from that Account.In other words, if you delete your keyfile and do not have access to a backup copy, any ether you have stored with that Account is lost forever.To backup your keyfiles (Accounts): If you are not going to be using an Account any time soon, that is, you are not going to be sending any transactions from that Account, you may want to backup its keyfile and then delete the keyfile from the keystore subdirectory in your computer.

It may be a good idea to test your backup and restore procedure with a small amount of ether first, before you send the mother load in.Each keyfile is a JSON text file which you can open and view in any text editor.The critical component of the keyfile is your Account’s private key.Importantly, this private key is always encrypted, and it is encrypted with the password you entered when you created the Account.So now you know what that password entry was all about!Hopefully you are in the habit of using strong passwords.For anyone (you, a thief) to send transactions from an Account, including sending ether of course, they must have BOTH the keyfile and the password.So be absolutely sure to have a copy of your keyfile AND remember the password for that keyfile, and store them both as securely as possible.. There are no escape routes here; lose the keyfile or forget your password and all your ether is gone.The first time you run the Wallet App, you may see an Etherbase Account already present.
You might even see additional Accounts, like Account 2, Account 3, etc. This happens if you have run a previous version of the Wallet App and created those Accounts in that older version.(It can also happen if you have previously run a standalone version of Geth using the default location for the data directory.)Why are these old Accounts appearing in your brand new Wallet App?Well, because the Wallet App will continue to use the same data directory all the time.When you overwrite an older version with a new version, you do not erase the data directory and its keystore subdirectory.So any keyfiles from before will still be accessed by the new Wallet App and appear as corresponding Accounts in your opening screen.What you do next will depend on whether you have any ether.And if you do have some ether, then how that ether is currently held; is it in a Presale Wallet, at an exchange, in cold storage, or already in an Account.If you do not yet own any ether, skip to the section that shows you how to get some.
Before you can start using the Wallet App to send your ether around, you will have to first gain access to it.To gain access, your ether should be in an Account that is displayed in the Wallet App.Under the hood, this means that the Wallet App has access to the encrypted keyfile that controls that Account.This may be ether (ETH) recently bought at the exchange using bitcoin (BTC).Or, it may be ether from your Presale Wallet that was deposited into the exchange using the exchange’s Presale Wallet import tool.To withdraw ether from an exchange: Once the withdrawal has completed, you will see the withdrawn ether in your Etherbase Account the next time you start the Wallet App.(Note: Do not be concerned that you do not see the transaction listed under LATEST TRANSACTIONS.This is explained later.)If you still haven’t even partially spent from your Presale Wallet, then it’s probably best that you wait until the Presale Wallet import feature is added to the Wallet App.This should be soon, as promised.

Note: There are currently several ways you can import your Presale Wallet while waiting for the Wallet App to incorporate this feature.You can use the command as described here with the Wallet App’s bundled Geth node.Admittedly this will require familiarity with the command line and so is not for most people reading this guide.Or, you could use the tools provided by the exchanges. which has a Presale Wallet import feature.You should carefully assess the risks of using any of these methods.If you are at all uncomfortable, then wait for the Presale Wallet import feature.miners, early contributors) will already have their ether in an Account.This implies that you have a working copy of the Geth client which you have used to create your Account.Your existing Accounts should show up in the Wallet App when you first run it.If they don’t, then make sure that the keystore folder holding your Account keyfiles is in the data directory being used by the node that’s linked to the Wallet App.

See here for the default data directory locations for each operating system.Some of the ways in which users could currently be doing cold storage: 1.They copy individual keyfiles or the entire keystore folder onto a USB stick or some other removable media and erase the keyfile or keystore folder from their computer.They simply print out on paper the contents of the keyfile.This is a JSON text file that includes the encrypted private key.They then erase the keyfile from the keystore folder in the computer. to create a classic, key-pair Paper Wallet.The address and encrypted or unencrypted private key are printed out on paper, with or without QR codes.Note: If you have taken this route, your private key must be unencrypted so that you can use the function to create a new keyfile that will be entirely compatible with Geth and the Wallet App.How to get your cold storage wallet into the Wallet App To import an Account from a Paper Wallet: Note: You will need to use a separately installed Geth node or the Wallet App’s bundled Geth node directly to implement this procedure.

You need to be comfortable working with the command line interface.Because you did not specify a data directory with the command (Step 2), the newly created keyfile will appear in the default data directory.You should now see the Paper Wallet Account with the correct balance displayed in your Wallet App.Ideally, acquire some ether from a friend.If that’s not possible, use bitcoin (BTC) and exchange for ether (ETH) through a traditional exchange (e.g.Alternatively, use a service like ShapeShift.io with which you can immediately exchange bitcoin and other cryptocurrencies for ether.Whichever route you take, there will be a need to enter your new Account address at some point during the transaction.For example: To get ether from a friend: If you want to try a traditional exchange, this post seems like a useful guide on how to trade BTC for ETH on Poloniex.ShapeShift.io is a convenient way to acquire smaller amounts of ether.It is generally agreed though that for larger amounts, going through an exchange should be cheaper.

Using the service is quite intuitive, but if you need some help you’ll find it here.Note: Until further notice, always use an Account when Sending to or Receiving from ShapeShift.io.Do not use a Contract Wallet, which you will learn about in Chapter 2.Now that you are in possession of some ether and that ether is in an Account that is displayed in your Wallet App, you can proceed to experiment with the Send function.To send ether between Accounts that are in your Wallet App: You can send ether to any Account, including those not in your own Wallet App of course.All you need to execute a successful Send transaction is the receiving address.To send ether to any Account: You will incur a cost when you execute a transaction in Ethereum.Gas is the unit in which transaction cost is denoted.When you do a plain ether transfer from one Account to another Account, the transaction cost is 21,000 gas.You pay for gas with ether.The cost in ether of one unit of gas is determined dynamically by the Ethereum network.

This gas price can be viewed in the Network Stats page.In January of 2016, 1 unit of gas cost 0.00000005 ether.So a 21,000 gas transaction like the ether transfer you just did, would cost 0.00105 ether (or 1.05 Finney).For a slightly more elaborate explanation, refer to this post.Different types of transactions will incur different gas costs.The Wallet App will estimate the cost of the transaction you are about to execute.Any excess fee in that estimate will be refunded to your sending Account immediately upon execution.If you have worked through this chapter, you should have at least one entry under LATEST TRANSACTIONS.The thing is, you may have expected more than one transaction to be listed if you have received ether from a friend, or an exchange or ShapeShift.This is where the following note in the Wallet App comes in: “Accounts can’t list incoming transactions, please create a wallet to store ether“.You will learn about wallets that CAN list incoming transactions in the next chapter.