genesis_block.json ./build/bin/geth --genesis ~/genfiles/genesis_block.json cd go-ethereum build/bin/geth -rpc console : Ctrl + C build/bin/geth --rpccorsdomain localhost 2>> geth.log & ethminer -G -M --opencl-device 0 tail -f geth.log I initially had some trouble b/c I had an AMD embeded video card and an AMD GPU.">
Ethereum Linux Miner
ethereum linux miner

This guide is now OUTDATED and has been updated: The New Guide 7/29/2015 @ 11:46pm Added instructions on transitioning from testnet to Frontier. posts and getting no where.I'm a novice when it comes to all this collaborative code development so I just needed a simple-stupid guide for me!I've collated everything in one place for those that are running Ubuntu.This works from a clean install of sudo apt-get -y update sudo apt-get -y upgrade -f sudo apt-get -y install git sudo apt-get -y install software-properties-common sudo add-apt-repository ppa:ethereum/ethereum sudo apt-get update sudo apt-get install -y build-essential libgmp3-dev golang sudo apt-get -y upgrade /ethereum/go-ethereum cd go-ethereum backup your old key file (if you mined on test net): sudo cp -r ~/.ethereum/keystore ~/Desktop/ Now lets continue with geth install and get the latest version of geth: git checkout master Clear out your old blockchain (only if you've run geth on test net previously) sudo rm -r ~/.ethereum/extra/ sudo rm -r ~/.ethereum/state/ sudo rm -r ~/.ethereum/blockchain/ sudo apt-get install curl cd ~ sudo apt-get install -y python-pip python-dev build-essential sudo pip install --upgrade pip sudo pip install --upgrade virtualenv mkdir genfiles cd genfiles /ethereum/genesis_block_generator/master/mk_genesis_block.py curl -O -k https://bootstrap.pypa.io/get-pip.py sudo python get-pip.py sudo python -m pip install bitcoin cd .. cd go-ethereum make geth (if you throw an error on make geth and you go back and try and fix things, make sure to delete the go-ethereum directory before trying to make geth again (error help me!)) build/bin/geth account new now we'll install ethminer cd ~ sudo apt-get -y install language-pack-en-base sudo dpkg-reconfigure locales /apt/llvm-snapshot.gpg.key | sudo apt-key add - /apt/trusty/ llvm-toolchain-trusty main" sudo add-apt-repository ppa:ethereum/ethereum-qt sudo add-apt-repository ppa:ethereum/ethereum-dev sudo apt-get -y update sudo apt-get -y upgrade sudo apt-get -y install build-essential git cmake libboost-all-dev libgmp-dev libleveldb-dev libminiupnpc-dev libreadline-dev libncurses5-dev libcurl4-openssl-dev libcryptopp-dev libjson-rpc-cpp-dev libmicrohttpd-dev libjsoncpp-dev libargtable2-dev llvm-3.8-dev libedit-dev mesa-common-dev ocl-icd-libopencl1 opencl-headers libgoogle-perftools-dev qtbase5-dev qt5-default qtdeclarative5-dev libqt5webkit5-dev libqt5webengine5-dev ocl-icd-dev libv8-dev /ethereum/cpp-ethereum cd cpp-ethereum git checkout master mkdir build cd build cmake .. -DGUI=0 -DETHASHCL=1 make -j2 sudo make install sudo apt-get install cpp-ethereum #(Can someone confirm that skipping to this step still works) cd ~ cd go-ethereum If cmake .. -DGUI=0 -DETHASHCL=1 fails for you, try this variant: cmake .. -DGUI=0 -DETHASHCL=1 -DEVMJIT=0 Once the genesis block is release do this: (No Longer Required in go-ethereum later than release/1.0.0) python ~/genfiles/mk_genesis_block.py --extradata 0x11bbe8db4e347b4e8c937c1c8370e4b5ed33adb3db69cbdb7a38e1e50b1b82fa > genesis_block.json ./build/bin/geth --genesis ~/genfiles/genesis_block.json cd go-ethereum build/bin/geth -rpc console : Ctrl + C build/bin/geth --rpccorsdomain localhost 2>> geth.log & ethminer -G -M --opencl-device 0 tail -f geth.log I initially had some trouble b/c I had an AMD embeded video card and an AMD GPU.

Make sure you are targeting the right GPU card by changing the opencl-device # until you find the right card.Reference this list to see if you are targeting the right card.Once your are done benchmarking, post your results here.build/bin/geth --rpc console ethminer -G --opencl-device X here.
ethereum mh/s gpuexport GPU_MAX_ALLOC_PERCENT=95 One last check after you start mining, make sure your coinbase account (the account where your mining rewards will be deposited) is set.
bitcoin core armoryYou can check this by typing the following inside the geth javascript console: web3.eth.coinbase If this returns '0x0' that means you're mining rewards will get sent into a big black hole.
fedora 20 bitcoin client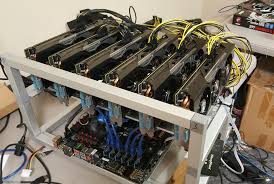
Fix this by typing the following inside the geth java scrypt console: web3.miner.setEtherbase(web3.eth.accounts[0]) That will set your mining account to your primary account.You can mine with multiple cards.Plug them both into your board and turn on geth "build/bin/geth -rpc console".
litecoin server hardwareLet the chain sync.
bitcoin abraThen pop open a second terminal and type: ethminer -G -t X where X is the number of GPUs you have to mine on.
vendita bitcoin italiacd go-ethereum git pull make geth cd .. cd cpp-ethereum git pull make geth cd go-ethereum build/bin/geth removedb Mining FAQs Live Update Building on Ubuntu Final Steps for Frontier Code formatting brought to you by codeformatter.

Bitcoin is getting all the press, and Bitcoin mining can be profitable.But the equipment is noisy, expensive, and hard to get.If you want to get started in crypto-currency, and have a little bit of technical knowhow, I recommend you build a GPU mining rig first.GPU mining rigs are just as profitable as Bitcoin mining, the products are easy to purchase, and the GPU cards have a 2 year warranty in case you burn them out.They are multipurpose, and can be used to mine many different crypto-currencies.These will usually pay for themselves in one year, including the cost of electricity.After that you are making money.I’ve been building mining rigs using Ubuntu linux for a while now.I really like the AMD RX480 cards, and recently moved my Ethereum miners to using Claymore’s mining code.I wanted to mine Zcash also, and found that the AMD R9 Fury cards were better than the AMD RX480’s.The first miners I built for Zcash used the SilentArmy miner for Ubuntu.It was good, but Claymore’s Windows version was 3 times as fast!

I moved the machines to Windows 10 and ran the Claymore miner.Fabulous performance, no problems.Except I don’t like Windows 10.When I need to check on the miner, or reboot it, I want to be able to SSH to it directly, make the change, and be done.Windows was rebooting at inconvenient times for updates, and I hated having to VPN in and get a GUI going with NoMachine just to make a change.So when Claymore came out with a Linux version of the Zcash miner, I was very happy.I built a new 6 GPU mining rig and got things going.It works really well.It’s set up to run headless on Ubuntu 16.04 LTS with the latest AMD drivers.This same basic setup can be used to mine for Ethereum and Monero also.Check out the Stats – 2515 Hash/second.This box uses 7 amps at 240 VAC – 1600 Watts of power.In January of 2016, this box generates $250/month of Zcash, and uses about $50/month of electricity, for a net of $200/month, or $2400 per year.First year mining pays for itself, then it’s making you money.

Plug that into the Equihash numbers at Coinwarz, and you’ll see Zcash comes out pretty good.Equipment list – Links are to Newegg or Amazon or Parallel Mining product page Total Cost for Bill of Materials – $2270 I used an MSI board in the video, and the Biostar on a different build.I like the Biostar better because it does not require any messing around with BIOS.And it costs less.Buy twice as many PCI-E risers as you think you will need.I’ve tried 3 different brands, and usually half of the risers will be bad and won’t work.Most of the time the GPU card will stop working due to a bad risers after a few hours or a day.This latest batch had some that had electric shorts that prevented the PC from starting!You may want to buy two of the HP power supplies also.As an option, you can buy AMD RX480 graphics cards instead of Fury’s.The RX480’s use less power.Most of my mining rigs use AMD RX480’s.Here is one I like a lot: XFX Radeon RS RX 480 DirectX 12 RX-480P836BM 8GB 256-Bit GDDR5 PCI Express 3.0 CrossFireX Support Video Card If you use the RX480 instead of the R9 Fury (item 9 above), you will use less electricity.

You will not need to buy the second power supply (Item7 above).The hash rate will be less, and it will use less power also.This is an output from an RX480 6-GPU rig running Claymore Zcash miner 11.1 for linux: I always forget something when I build the machine.Here’s some basic instructions for the most efficient order of operations.The idea is to get a basic computer built, troubleshoot any potential issues, install the operating system and application, then build the rest of the machine.If it doesn’t boot, this is the time to do basic troubleshooting.Don’t add any more graphics cards until later after the operating system is installed.The motherboard has a VGA connector if you want to connect a monitor directly to it.Just make sure there are no graphics cards plugged in if you use the onboard video.Install Ubuntu 16.04 LTS Server Do a standard install using all the defaults , include OpenSSH on installation After install, login with your username and password Get ip address with Go to your PC, ssh to the Ubuntu machine, and do the rest of the setup from your PC so you can copy and paste the commands.

I prefer to SSH from Bash shell, but Putty is a good client also.Change colors in the VIM editor.If you don’t like VIM, use nano instead.Add in new file .vimrc In the file .bashrc change #force_color_prompt=yes to add this at the end: Upgrade the operating systems in a screen: Not sure why Ubuntu locks one IP address into itself when it first gets an IP address.So that needs to be changed.Step 1: Disable the default Firmware inherited names.Edit your /etc/default/grub les as root and fill them.Paste this into the new file you just created: Change device names to eth0 so it reads: Look up your hardware device name (MAC address) with Go to your DHCP server and map your preferred IP address to the hardware address.You’re on your own for that one.Check in the screen to make sure the update is finished When the update is finished REBOOT ssh to box using the new IP address you assigned in your DHCP server!If you didn’t, then it should be at the same address as before.

If you can’t find it, login to the terminal at the computer, type if you only have a loopback address of 127.0.0.1 then run the DHCP client to get an ip address you can ssh to and redo the network fix.Option 1 to install the AMD driver: If that doesn’t work, try option 2 Copy 3 files from PC to server Install AMD driver Install AMD SDK (optional – some application need this, others don’t) Add user to video group Edit the config file for xorg-legacy: delete the last line: allowed_users=console insert at end of file: Create a new file for operating without a monitor connected to box: Make sure X works for user on login Add the following at end of .bashrc Change /etc/profile to make it work # add the following at end of /etc/profile: Set variables when user calls X Update config.txt file.Use your own zcash address if you prefer in the zwal setting.Watch and see if anything breaks.This could be an error code, hardware freeze, or something else.