bitcoin win7 64bit

404 Page Not Found.Ooops, the page you're looking for does not exist.Processor: AMD FX 4100 4-Core Processor Memory/RAM: Gskill Ripjaws 8GB Power Supply: Raidmax RX-1000 - 1000W 80 PLUS Gold Power Supply Graphics card: Sapphire AMD 7950 Dual-x Operating system: Windows 8 64bit Professional AMD Drivers: 13.8 Beta Cgminer: 3.4.0 GPU Settings: MSI Afterburner This tutorial is a compliment to the Cgminer-Linux tutorial.You can find that Here.In comparing Windows, and Linux for mining purposes.Windows has some important features, that Linux simply does not have.The most important, is the capacity to adjust the voltage settings on "unlocked" graphics cards.This can lower your temperatures by 10C, which is significant, when it comes to mining.This configuration of cgminer, I will be using two Sapphire AMD Radeon 7950 GPUs, First, download, and install the drivers, and the cgminer software.They can be found at the links above.Always use the latest version.

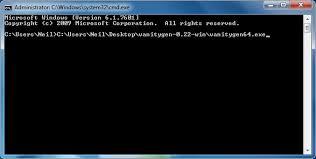
If you run into problems, you can always roll back your drivers, and cgminer versions.Unzip cgminer into a folder on your main drive.For example: C:\cgminer-3.4.0-windows Make sure you reboot your computer, after you've completed the installation.Once the reboot is complete.We need to set our environmental variables.Open your command prompt (with administrator access), and type the following commands: setx GPU_MAX_ALLOC_PERCENT 100 setx GPU_USE_SYNC_OBJECTS 1 It should give you a visual confirmation, that it was successful.You can double check that these environmental variables are set, by going into the control panel>search "variable">Edit environmental variables for your account.This should open a new window, where your environmental variables are shown.If you do not see them here, you must add them in.Click "New", and enter the variable name, and value above.It should look something like this: Now that you've verified the installation of the environmental variables, we can verify that cgminer recognizes your gpu.

This will give you a good head start on creating your .conf file.Depending on how you want to configure your mining rig, these settings can be static, or dynamic.You can find all of the possible commands inside the cgminer directory, in the "README" & "SCRYPT-README" files.
bitcoin market cap explainedPulling information from my previous Sapphire 7950 installations, I already know a good working range for the clock/mem speeds.
bitcoin mining pool youtubeSome of these basic settings for the 7950 can be found in this review: Sapphire 7950 Dual-x Graphics Card Review.
trade bitcoin metatraderBelow are the settings I used for this tutorial.Your results may vary.Now that we have our cgminer.conf configured.We need to create a .bat file Inside the cgminer directory.

You can do this by "right mouse-click">New>Text Document, inside the cgminer directory.Name the file Cgminer-Start.bat (or something you'll remember).This file will be setup to automatically start mining when your computer reboots.I automatically delete the .bin file.I do this every time cgminer starts up.By not deleting your .bin file, it can be the source of many problems.The .bin file stores information about your settings.It's good practice to automatically delete this file.The settings are as follows: Now that we have our cgminer.conf and Cgminer-Start.bat we can begin our final adjustments.Cgminer can be initialized, by simply double-clicking on the Cgminer-Start.bat file.Once it starts up, you can then begin card optimization.Using the configuration settings for the Sapphire 7950 above, this is the result.Keep in mind, there was no modification of the voltage settings.Hence, the high temperatures.Manually adjusting cgminer's GPU settings can be done by pressing [G] on your keyboard.

This will bring you to a menu where you can select which option you need to adjust.Get to know the adjustment settings in cgminer, they can save you a lot of time, when fine tuning your GPU's.Alternatively, you can adjust your settings inside MSI Afterburner, in real time.Either option works well.Using Afterburner is crucial when bitcoin/litecoin mining on Windows.It's relatively easy to install, and get setup.You can download the latest version of Afterburner at the link above.After installing Afterburner, you'll need to modify your configuration file.It's located in: C:\Program Files (x86)\MSI Afterburner\MSIAfterburner.cfg Open the MSIAfterburner.cfg, and near the bottom of the file, you'll see this area: You must add the correct information in the fields, like in the picture above.This will enable Afterburner to overclock your graphics card.Please note, that any damage to your computer, or graphics cards, are your own responsibility.Inside Afterburner, in the settings menu, you'll see the following.

Master graphics processor selection - Sync GPU's only if they are the same type & speed General properties - Start with windows - do this if you want your mining to be automated at startup Compatibility properties - Enable all of these properties for over clocking & stability Update checking properties - Only enable if you want to check for software updates to Afterburner AMD compatibility properties - Enable extending official overclocking limits, use caution Knowing that my cgminer configuration is good at the current settings.I need to lower the voltage, to get the temperatures down.On the Sapphire AMD 7950 GPU's, the stock voltage is: 1.125V.After some adjustment, I ended up with a voltage of 1.100V.This ran stable, and cool.Just what we want.After I determined the settings that worked best with the 7950's, I "Saved" those settings within Afterburner, as a "Profile".Making it easy to recall these settings.Since this mining rig will be automated, I selected "Apply overclocking at system startup".

This will apply my saved profile "1", every time I boot up the computer.In the illustration below, I wanted to show the temperature difference between stock voltage, and undervolting the GPU.The result speaks volumes.Keep in mind that this test was performed with an "open-air" rig, using PCI-e risers.Ambient room temperature of 78F/25.5C Automating startup in windows is fairly straight forward.Make sure that your MSI afterburner settings, are saved in a profile, and you've selected the appropriate settings for startup.A good practice is to create a shortcut for your Cgminer-Start.bat, by right mouse click > create shortcut.Then drag this shortcut to your desktop.This will keep available for quick access.Once the shortcut is created, you'll want to copy it into the startup directory.The path should look something like this: C:\Users\username\AppData\Roaming\Microsoft\Windows\Start Menu\Programs\Startup\ This will trigger every time you startup your computer.It's a simplistic approach, but it works.
{ "pools" : [ { "url" : "https://Poolinfo:9327", "user" : "username", "pass" : "password" }, { "url" : "poolinfo", "user" : "username", "pass" : "password" }, { "url" : "poolinfo", "user" : "username", "pass" : "password" } ], "intensity" : "19", "vectors" : "1", "worksize" : "256", "kernel" : "scrypt", "lookup-gap" : "0", "thread-concurrency" : "21376", "shaders" : "0", "gpu-engine" : "1100", "gpu-fan" : "85", "gpu-memclock" : "1600", "gpu-memdiff" : "0", "gpu-powertune" : "20", "gpu-vddc" : "0.000", "temp-cutoff" : "95", "temp-overheat" : "85", "temp-target" : "75", "api-listen" : true, "api-port" : "4028", "expiry" : "120", "failover-only" : true, "gpu-dyninterval" : "7", "gpu-platform" : "0", "gpu-threads" : "1", "hotplug" : "5", "log" : "5", "no-pool-disable" : true, "queue" : "1", "scan-time" : "30", "scrypt" : true, "temp-hysteresis" : "3", "shares" : "0", "kernel-path" : "/usr/local/bin" }