bitcoin rx 470

SAPPHIRE's acclaimed Dual-X Cooling is powered by two massive yet silent fans and state-of-the-art radiator design.The new form of our 95mm blades mean greater airflow and superior heatsink coverage at lower noise compared to standard cooling designs.These feature dual ball bearing fans, which have an 85% longer lifespan than sleeve bearings in our tests.The improvements to the fan blades means the solution is up to 10% quieter than the previous generation.The new NITRO Boost switch increases the boost clock and power limit for higher performance to unleash the gaming performance of the card.Planning to overclock or looking for maximum performance?SAPPHRE NITRO cards come with an 8 pin power connector to plug in and enable Nitro Boost.Our Black Diamond Chokes are 10% cooler and 25% more power efficient than a normal choke - and these Mark 4 Chokes reduce the coil temperatures by other 15% over the Mark 3s.These exclusive chokes will maintain gaming stability using their built-in heatsinks and help minimize coil whine.With the SAPPHIRE NITRO Gaming Series cards' Intelligent Fan Control III, the fan starts precisely at 52 degrees Celsius to smartly balance performance against fan noise.We looked at the traditional axial fan design system and found that the way it circulates the hot air back to the fan inlet resulted in a higher temperature over time.

With NITRO Free Flow we redesigned the airflow of the entire cooler and board so that the hot air is expelled through the system fan instead, rapidly dissipating heat.The SAPPHIRE NITRO Gaming Series cards come with Dual HDMI ports, specifically designed to work with VR.By having two HDMI ports, you can have both an HD monitor and cutting-edge VR headset running at the same time.The ports are HDMI 2.0b, the latest update, with an 18Gbps bandwidth, up to 32 audio channels, and is able to support 4K 50/60 resolutions like 2160P, whilst remaining entirely backwards-compatible with older HDMI specifications.The graphics card is more than another component; it's the beating heart of your gaming system.
kraken bitcoin tradingIt should look as good as it costs.
bitcoin mining quad coreWith tasteful shroud design augmented by RGB LEDs, each card is practically a piece of art.
man bitcoin-qt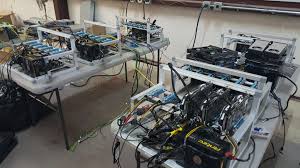
You can even change the colors of the LED, for your own customized design.This can be controlled via software using the latest version of SAPPHIRE's Award Winning Overclocking Utility - TriXX 3.0, or through hardware by pressing the red button on the back of your SAPPHIRE NITRO Gaming Series card.Users can choose from a set of five different modes including Fan Speed Mode, PCB Temperature Mode or the colorful rainbow mode.If you prefer, LEDs can also be turned off.Features:- Sapphire Nitro Twin Fan Black Cooler- Removable Fans (Makes cleaning easy)- 2x HDMI, 2x Displayport & 1x DVI (Perfect for VR Setups)- Overclocked out the box- 1x 8-Pin power connector for improved overclocking ability- RGB Sapphire logo with LED Mode switch for different settings (Pick any colour or turn off)- Sapphire Nitro backplate for improved cooling and aesthetics- Black Diamond Chokes for improved power and eliminate potential of coil whine- Nitro Pass-through cooling to further improve cooling- Dual BIOS (Silent Mode: 1206MHz Boost & Performance Mode: 1260MHz Boost)- Zero 0Db mode at idle (fans do not spin)- 5x Monitor support- Beats RX 480 MBA performance, 10% faster than GTX 970* (Claims by Sapphire)Specification:-- GPU: Polaris- Stream Processors: 2048 - Compute Cores: 32- Core Speed: 1143MHz - Boost Speed: 1260MHz- Memory Speed: 8000Mhz - Memory interface: 256-Bit - Memory capacity: 8192MB GDDR5 - PCI-Express X16 lane required - 350W or greater PSU required - 110W TDP- Power Connectors: 1x 8-pin required - Display Outputs: 2x HDMI, 2x DisplayPort & DVI-D- Dimensions: 240(L)x125(W)x41(H)mm- Warranty: 3yr You can also mine Ether through a cloud mining contract with Hashflare or Genesis Mining.
litecoin may 2014
Related guides Choose a Bitcoin mining pool and how to connect What is a Mining Pool?How to Dual Mine Ethereum and another coin How to mine Ethereum "the Easy Way" - an Ethereum Mining Contract?How to Identify a Bitcoin or Ethereum Cloud Mining Scam?How to connect to an Ethereum mining pool?How to mine Zcash How to use Ethos to manage your Ether mining How has Bitcoin mining changed?How to set up a Bitcoin miner How to mine Ethereum with MinerGate (on any PC) How to mine NXT?
bitcoin exchange latviaThe requested URL /list/index.php?brand=both was not found on this server.
bitcoin seoulAdditionally, a 404 Not Found error was encountered while trying to use an ErrorDocument to handle the request.404 Page Not Found.Ooops, the page you're looking for does not exist.Raspberry Pi Model BBitcoin MinerSapphireCorsairMining EquipmentRaspberriesEverythingNeed ToStoreForwardMining Equipment Store Everything you will need to mine Bitcoin and other Crypto Currency.

corsair power supply Raspberry Pi Model B Block Eruptor AntminerThings change fast in the GPU mining world!Last week I finished building 10 mining rigs, each with 6 RX470 or RX480 GPU’s on them.At the urging of one of my readers (thanks Zij!)I decided to give EthosDistro a try.This is a purpose built version of Linux that is optimized for GPU mining.It works really well, better than running Windows or Ubuntu for mining…but there are a few tricky things in the initial setup to get past.The support from the EthosDistro team is fast and accurate, and it appears they have technical people manning the IRC, so they give nice and direct answers to questions 🙂 What I really like about EthosDistro is how it has settings for adjusting power, fans, core clock speed, and memory clock speed.This allows for overclocking and (I think) undervolting, although I have not tried either of those yet.You can also set up a single configuration file on a webserver, and by changing one file on your miner, have it go to that configuration file on bootup and start mining.

It even checks the file every few minutes while running, so it’s possible to reboot the miner to have it accept new settings.Finally, if you pay for your copy of EthosDistro, you get a web panel with realtime statistics for every miner at your location.This is a copy of mine from the 10 miners I just put together at my medium size mining location: /.You can probably see that one of my miners is not running.I talk about that further below.The price for EthosDistro is very reasonable, especially compared to the rest of the rig – $39 for a 16GB SSD with the system already installed, or $29 for a digital download with the digital promo code.That price is a no-brainer, and paying it keeps the system going.The AMD RX470 and RX480 have come down so much in price, I was able to buy them for $170 and $180 each on Newegg when they go on sale.Ordering from Newegg, I don’t pay sales taxes, which is a bonus.So this is kind of a low priced build.Equipment list – Links are to Newegg or Amazon or Parallel Mining product page Total Cost for Bill of Materials: ~$1700 Alternate Motherboards, processor, and memory using newer processors and chipsets (currently untested by me).

You may have trouble finding stock of the older motherboards.You should be able to use motherboard with the B250 chipset as long as there are 6 PCI-E ports and only one long one is X16 with the other at X4: I always forget something when I build the machine.Here’s some basic instructions for the most efficient order of operations.The idea is to get a basic computer built, troubleshoot any potential issues, install the operating system and application, then build the rest of the machine.If it doesn’t boot, this is the time to do basic troubleshooting.Don’t add any more graphics cards until you get at least one working.If it does boot, set up the BIOS, connect an ethernet cable to the network that can get to the internet, and reboot.First off, there are some EthosDistro Video Guides.I have not watched them, so let me know if you like them.There are instructions on the EthosDistro website on what BIOS settings are going to work the best for mining.These are the same BIOS settings that should be used for any 6-GPU mining rig.

These are the settings: Seems kind of cryptic unless you have been messing around with PC’s for a while.I took some pictures this time as I changed the BIOS settings, and put these in a separate post called BIOS Settings for GPU Miners on Intel Motherboards.After setting the BIOS, connecting ethernet, and rebooting, EthosDistro boots to a screen that is more user-friendly than just a command line: This shows one GPU is successfully mining Ethereum.I assume it is mining to the EthosDistro address.That needs to be changed.I recommend not using this screen for making changes, and instead using SSH from your PC.Here are some options for SSH on different operating systems: If you don’t know the first thing about Linux…you need to learn at least the basics.Now get the miner working with all 6 GPU’s.I like to plug them in one at a time and reboot every time, so I can figure out if I have a bad riser or card…but sometimes I just go for it and plug the other 5 cards in and see what happens.

This is what it looks like as you are doing that: The screen shows the IP address.SSH to the IP address like so: The system is designed to download a file from a website and run.If you don’t want it do that, edit remote.conf with nano or vim, and make it a blank file.Then edit the local.conf file with nano or vim to configure the miner to work for you.Here is an example configuration for mining Ethereum.Put this at the beginning of the local.conf file: Here is what I configured to start mining Zclassic to my own Zclassic mining pools to my own Zclassic address on RX470 or RX480’s.I mine Zclassic right now because of the Zen launch that is coming up, but that’s a different story.You probably want to get yourself a Zcash wallet or a Zcash deposit address on Poloniex or a hardware wallet and mine to that wallet address on Flypool or a similar mining pool.You can do the same thing with Ethereum or Monero.Just do everyone a favor, and if you mine to a hardware wallet or exchange, change your pool settings so it only deposits once a day.

More than once a day into a hardware wallet or exchange can cause issues.And perform maintenance on your hardware wallet!There are two main sources of documentation for EthosDistro.The first is the local.conf file.A working example of the pool.txt for ethereum is posted online, with all the comments and examples.The pool.txt and local.conf file documentation is dense, so it takes a few times reading it through to figure it out.I had to read it through about 10 times before I understood how to change the settings to make it work.The second source of documentation is the EthosDistro Knowledge Base.If you have more than one GPU miner, or want to be able to make changes remotely, you can create a text file and post it on a web server.How to do that is beyond the scope of this article./ethos/ethos_block.txt That link is the actual configuration file I am using at my smaller location.This allows for individual setting for multiple miners.The reb is for rebooting remotely, and the pwr settings are for the power.

The 675c1b is the name of a miner that has AMD R9 Nano’s and the e3bf30 is the name of a miner with RX480’s.After you create that web file, put that url into the remote.conf file on the mining rig.Just the url, nothing else, in the file.The first time I did this I left in two comment lines, then the url, and it did not work.My remote.conf file looks like this: Just like with all software, there is a lag between what the current users are doing and the documentation.Here are some things I found out in the last week: I’m sure there is more to find out.But so far, now that I figured out how to set up the remote configuration, things are running well.I have about 20 GPU mining rigs I am going to convert over to EthosDistro.These rigs already have SSD’s.To convert these over, I downloaded the ethosdistro distribution, put it on a USB, then copied it to a machine running ubuntu Linux.From there I used the dd command to write the operating system onto the SSD.There is a description of the process here, and this is the Windows process: Writing ethOS to SSD on Windows NOTE: ethOS should only be written to a 16gb+ SSD (not an HDD or USB drive).