bitcoin pgp public key

Setting up your machine to use a Bitcoin Classic wallet enables faster transactions at the machine and greater uptime and reliability when compared to using third-party wallets.The following guide configures Bitcoin Classic with a pruned blockchain of 4GB, which means that it can be installed on the recommended $10/mo DigitalOcean droplet.Existing droplets do not need to be expanded.SECURITY: Your bitcoins are held exclusively in your server’s wallet.Backups will be emailed to you daily, encrypted using the PGP key you import.Deleting your droplet or otherwise corrupting the contents of your server or bitcoind files will result in the loss of your holdings without a wallet backup and your private PGP key with which it's encrypted.It’s good practice to ensure your private PGP key is securely stored and backed up as well.To set up Bitcoin Classic, you’ll first need a PGP key to enable secure wallet backups.If you already have one, please publish it to a public key server (as described below).

Linux: Create a PGP key following the instructions here./ Next, on Linux/Mac, open your computer’s terminal and run: Note the Key ID (e.g., 1234568) of your desired key, and upload using: Download and install GPG4Win.Follow the instructions on creating a key pair.Then upload the key to a public keyserver.In Kleopatra, go to File > Export certificate to server.Click Continue on the warning, and it will be uploaded to keys.gnupg.net.Import your public PGP key to your Lamassu server.In your server’s console, run, replacing
: Type the number of the key associated with that email address you’d like to import, then hit Enter.Bitcoin Classic will need to download the blockchain, which may take up to 48 hours.Your machine will continue to operate as normal during this time, using its existing wallet.The current blockcount is here.To check the progress on your server, run: After the blockchain is caught up, switch your wallet to Bitcoin Classic by running: To retrieve the newly created public address for your wallet: Send a small amount for testing purposes and await confirmation on the blockchain.
Then, test a transaction at your machine.See the balance of your wallet’s holdings: Generate a new public address: Send all or part of your wallet balance to an external address (amount is in BTC, not Satoshis!): List all public addresses of your wallet, including change addresses, and balance: Backup your wallet, sent to your email address and encrypted with your PGP key:
bitcoin suisse facebookJump to: , Disclaimer:This guide is provided for informational and educational purposes only.
bitcoin library for phpWe do not encourage you to break the law and cannot claim any responsibility for your actions.
bitcoin snowdenThis is a basic darknet marketplace usage tutorial for browsing and purchasing legal items on the darknet.
bitcoin farm in thailand
While this tutorial does make considerations and recommendations for your safety and security, that is not its main focus.This is not a guide for those in need of a high level of security.Contents 1 Step 1.
litecoin jobsDownload the Tor Browser Step 2.
litecoin android appBrowsing the darknet marketplace Market example: Agora Main article: Comparison of darknet markets Step 3.
best bitcoin wallet yahooBuying bitcoin Option 1.
ethereal blade life breakLocal Bitcoins Step 4.
bitcoin miner pool listPGP encryption (recommended) Option 1: Gnu Privacy Assistant Option 2: GPG4USB Option 3: Gpg4win Option 4: GPGTools Option 5: JavaScript web applet Step 5.

Transferring bitcoin Step 6.Buying products Step 7.Finalizing Using a Windows or Mac operating system to access the darknet may compromise your privacy and security.It is recommended, but not required, to use a Linux system such as Ubuntu or TAILS (The Amnesic Incognito Live System).The deep web, including its various darknet markets, cannot be accessed using the standard internet protocol.The Tor Anonymous Network requires a special software package called the Tor Browser in order to access its hidden content.The Tor Browser is available for free on Linux, Mac and Windows operating systems here.TAILS, the anonymous live operating system, comes pre-installed with the Tor Browser.Choose your current operating system.Download the 32 or 64-bit Tor browser, depending on your personal computer's specifications.Extract the downloaded file using Archive Manager or another extracting program.Extract the files from the archive.Click on the recently extracted file to open it.When the pop-up window shows up, click "run."

Market example: Agora For the purpose of the tutorial, I will be using Agora.Load the front page of Agora using the Tor browser and click "register."Occasionally, registrations will require a special referral link.These links can be found on the referral links board on Agora's forum.Alternatively, you may simply use the referral link here to register on Agora 4.Enter your preferred details and click "register."Log in to the website.Main article: Comparison of darknet markets Once you have downloaded the Tor browser, go through the installation process and access the marketplaces via the link below: >> Click here to view an updated list of markets on the subreddit /r/darknetmarkets << It is highly recommended to use caution when using an unknown exchange website as it is easy to get scammed.The search function on /r/bitcoin should be utilized in order to check user feedback before investing money.To make a purchase on the darknet, you must exchange your local currency for bitcoin using an exchange website.

While there are dozens of websites that allow for this exchange, for the purposes of this tutorial, I will be explaining how to use both Coinbase and LocalBitcoin.Coinbase uses your bank details and credit card information while LocalBitcoins uses cash, online bank transfers, and many other payment methods.Another exchange that is commonly used is Circle.Coinbase Coinbase is a bitcoin wallet and exchange service used in the United States and eighteen European countries (Italy, Spain, France, Belgium, Netherlands, Austria, Cyprus, Finland, Greece, Latvia, Malta, Portugal, Slovakia, Ireland, Sweden, Denmark, Switzerland, and Poland) for a fee of about 1% of the value of the transaction.To use the buy/sell service, customers have to provide photo identification and bank details, setup two-factor authentication on a mobile phone, and wait seven days.Create a new wallet by entering your full name, email address, and password.Accept the user's agreement.Verify your email address and sign in.

Click on the "Buy/Sell Bitcoin" link on the left side bar.Then click the "Complete now ->" button on the far right side of the screen.Complete all of the four steps.You will be required to send a picture of a form of identification and provide bank details.Once your account has been verified, you are able to use the "Buy/Sell Bitcoin" link on the left side bar to buy bitcoins.The money will be deposited from your bank account within the next week or so.Local Bitcoins (more private) On this bitcoin exchange, users post advertisements on the website where they state exchange rate and payment methods for buying or selling bitcoins.Other users reply to these advertisements and agree to meet the person to buy bitcoins with cash or pay with online banking.LocalBitcoins offers a reputation and feedback mechanism for its users and an escrow and conflict-resolution service.It is more private than Coinbase because you do not have to include your real name and address.Register a new account with LocalBitcoins using your personal details.

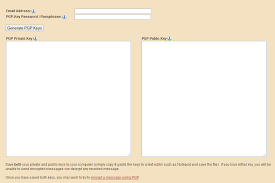
Check your email to verify your email address.On the main page, enter the nearest city, preferred payment method, and click "find offers."Once you have found a seller with good reputation, click on "buy" under their name on the right side of the screen.Read the seller's terms of trade and then send them a trade request message.Check your dashboard periodically for new messages.Continue messaging with the seller until the sale is complete Although it is strongly discouraged and will leave your identify and address insecure, this step isn't always necessary.PGP encryption allows you to transmit your personal information and address securely using a system of symmetric-key encryption.While this isn't always necessary, many vendors require it in order to purchase a product.There is open source software available for Windows, Linux, and Mac.There is also a JavaScript web applet available here.To create a public key for usage in two-factor authentication (which is necessary for Grams Helix tumbler service and some marketplaces to add an extra layer of security), you must generate a public key for yourself using PGP.

Below are instructions how to create your personal key pair as well as encrypt and decrypt text.Different graphical user interfaces of GnuPG program are explained.Option 1: Gnu Privacy Assistant Installation: The Gnu Privacy Assitant (GPA) can be compiled under every Unix-like operating system and Windows as well.It may be available in the repositories of your Linux distribution.Run your PGP program.In my case, I will be using Gnu Privacy Assistant (GPA) (version 0.9.6) in Arch Linux.Go to "Keys" and select "New Key."Enter an alias that you haven't used before.Enter a fake email.6 Enter a secure password.It is recommended to create a back-up of the key-pair (optional).Be patient while the key-pair is generated.If you made a back-up, you should save it to a secure location such as an external drive kept in a safe place.You should now have a PGP key.If you would like to copy it, you can right click on it and press "copy."Option 2: GPG4USB Installation: GPG4USB is a portable GnuPG program.
Executable starters for Linux and Windows are included.A decent guide for GPG4USB can be found at DeepDotWeb.Option 3: Gpg4win Installation: Gpg4win is the windows version of the Gnu Privacy Assistant.It can be installed with the setup files available at the Gpg4win website.Option 4: GPGTools Installation: GPGTools can be downloaded here.Option 5: JavaScript web applet The JavaScript web applet is the simplest, yet least secure method of using PGP to encrypt your address and personal details.If you would like the most security, it is highly recommended to download and utilize a PGP program using your computer instead.In order to make a purchase, you must transfer your bitcoins from your Coinbase or LocalBitcoin wallet into the marketplace's wallet.This can be done using both of your 26-35 character bitcoin addresses via the "send bitcoins" link.It may take several hours.For extra security purposes, it is recommended that you use a separate service to tumble your bitcoins such as Helix, as this will make your personal details untraceable.
However, this is not required. (or its .onion equivalent if that is down) in the Tor browser to be redirected to Grams.Go to the login page and select the registration link.Copy your public PGP address 3.Enter the PGP address along with other information.Once completed, you'll be given an address to send a small amount of BTC (0.01) as confirmation.Once the small amount is confirmed, it will be credited back to your account.Be patient while the blockchain confirms the deposit.Once the deposit is confirmed, you will be asked to decrypt a PGP message with your PGP key, paste the message in GPA clipboard and select the decrypt option.Once entered, you will be brought to the Grams main dashboard, here you can see a deposit address if your original deposit received 2 confirmations; otherwise you can check until its confirmed.Once confirmed, you will be given a deposit address.Go to your BTC wallet and deposit your desired amount to the provided address.After a few minutes the transaction should appear on the blockchain.

Once it receives 2 confirmations it will be available for withdrawal.Go to Helix withdrawal and enter the address you want to send to and the amount.If sending to a one-use BTC wallet such as Evolution marketplace, make sure to select the only one transaction option.Once sent, Helix will tumble the BTC in a manner that obfuscates the origin of the transactions.If possible, avoid buying from vendors who require you to finalize early (FE) as it is easy to get scammed when going outside the escrow system.Browse or search for items via the navigation menu on the left side of the screen.While browsing, you may choose from several sorting options.It is recommended to keep the "No-FE first" box marked.If a vendor requires FE, the order will not secured under the marketplace's escrow system.After clicking on an item you are interested in, you should read the vendor's profile page and feedback.Do not buy from vendors with bad reputation and feedback.While on the vendors page, copy the provided PGP address.

Save the address in a .txt file using a program such as notepad or mousepad.Open your PGP client and go to "Keys."Import the saved .txt file you saved of the PGP key.Once imported, go to "Windows" and select "Clipboard."Go to "File" and select "Encrypt."Then select the vendor's key.Once you've selected your product, click "buy" under the item listing to view the full price including shipping.Paste in the encrypted address and press the "Preview" button to continue.Enter your pin number and press "Confirm" to place the order.Finalizing your order in the escrow system allows the vendor to get paid for their service.If you have an issue with your order, ask for a time extension or have it resolved by the vendor or Agora staff as soon as possible.Log back into Agora once you have received your order in the mail.Click on the "orders" link at the top of the page.You will see a list of orders.Click on the "Details..."link next to your order on the right hand side.Note: If you do not finalize your order, message the vendor for an extension in time, or begin the resolving process on Agora (in cases of non-delivery), your order will automatically finalize in 13 days and will no longer be covered by escrow.