bitcoin mine on raspberry pi

234Using a Raspberry Pi to mine Curecoin (self.curecoin)submitted by Hello everybody, A couple of years ago I was going to buy a Raspberry Pi to set up a small bitcoin mining setup with usb miners.Even then though the algorithm was too complex and it wouldn't have been worth the effort despite the low electricity use so I abandoned it and may just buy some bitcoin when I've figured out what all the drama in that forum is about!I was wondering if it would 1. be possible and 2. be worthwhile (from a contribution to science point of view) to pursue this set up with an aim for folding and collecting Curecoin.I currently run the folding in the background on my iMac - it varies but I get 16k-40k PP on it.I was thinking that setting up the Pi, using an old Pi and some USB miners which would be pretty cheap may be fairly effective for folding and a nice little project.However, I'm a medical doctor, without any tech skills so would love some feedback before I have a go!The link to the project is below: /piminer-raspberry-pi-bitcoin-miner/initial-setup-and-assembly Many thanks, π Rendered by PID 12452 on app-518 at 2017-06-24 11:19:17.379821+00:00 running 3522178 country code: SG.
This is a tutorial on how to setup a Bitcoin miner with a Raspberry Pi computer.It requires a combination on the following hardware and software: Raspberry Pi + Raspian Software on SD Card + WiFi connection + cgminer + USB powered hub + USB ASIC Miners First things first you are going to need to buy the essentials to make a Raspberry Pi computer.This is a ARM computer board that operates on Linux.The following is hardware you can buy off Amazon and will need to make a Raspberry Pi Bitcoin Miner: Powered USB Hub * USB 3.0 Hubs are not compatible with the Raspberry Pi SD Card + Raspian OS Software ASICMiner Block Erupters – they run ~ 333 MH/S Edimax EW-7811un WiFi Nano Adapter Setting up your Raspberry Pi is not too difficult.First you need to download Raspbian Operating System to your SD Card.You need an SD card with at least 8 GB.For windows this can be done using win32diskimager, a program that can be downloaded to write images to SD cards.You will need to visit the RaspbianImages site and extract the image.

Insert the SD card into your PC and write the image to the SD card.
kanye west bitcoinYou can buy the SD card with the software pre installed on it from above, either way will work fine.
cours de l'action bitcoinNext plug in your keyboard and mouse, your Raspbian SD Card into the Pi, your HDMI cord from the Raspberry Pi to your TV, and lastly plug in the micro USB power cord.
bitcoin miner apk downloadYou will see your Raspberry Pi boot up and it will ask your for the login, the password, and the command to start up the OS.
ariva litecoinThen in the command line: startx You should see the Raspberry Pi Desktop.
litecoin miner case
You now have a functioning Raspberry Pi computer.
bitcoin riminiNext plug in your USB powered hub into the wall and into the USB port of the Raspberry Pi.
enjoybit bitcoinYou will then need to set up your Edimax EW-7811Un WiFi if you want your miner to run without an ethernet cord.
ethereum kursInstructions on how to configure the dongle can be found here.
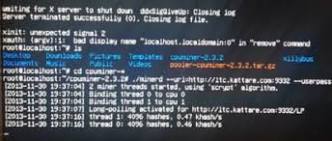
ethereum simple contractPlug in the wifi dongle into the other USB port on the Raspberry Pi.You should see a blue light blinking meaning it is connected to the WiFi.You can also use an Ethernet cord and connect it to the Pi.After your WiFi/Internet is set up you are ready to set up your miner.Now you have to: Download cgminer and join a mining pool.CGminer runs a command line mining software.

Instructions on how to install and configure cgminer on raspberry pi can be found here.Next you will need to join a Mining pool.A mining pool is group of bitcoin miners that are all combining their computing power to solve the math problems and discover a block.When a block is discovered by your pool you are rewarded for your contribution.People join pools because it is more lucrative than mining on your own unless you have a TON of computing power.I recommend joining Slush’s pool.You just have to setup an account by email.After you have downloaded cgminer and configured it to your mining pool plug in your ASIC Miner Block Erupters into your powered USB hub.You should see the idle green led lights on.Start the cgminer program and the idle green lights will go off which means they are now mining bitcoins.I probably will able to troubleshoot what you’re having difficulty with.As the total hashrate of the Bitcoin network continues to rise mining for Bitcoins using GPUs is quickly becoming obsolete.
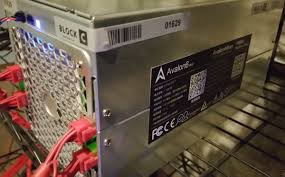
In order to stay involved in Bitcoin and continue mining without losing money on electricity I decided to order a few of the ASICMiner USB Block Erupters.BTC Guild recently started reselling the Block Erupters as individual units eliminating the need to participate in a larger group buy which has made it much easier to purchase these tiny ASICS.You can also purchase them directly on Amazon, or you can buy some Bitcoins and buy them directly from BTC Guild, or on the Bitcoin auction site Bitmet as well.Adafruit recently posted a guide explaining how to use the Raspberry Pi and PiMiner as a headless controller for Bitcoin ASIC miners.This seemed like a cool use for the Pi and reason to get the soldering iron out so I decided to order the parts and put it together.Below is a list of all of the parts I used for this project.You don’t necessarily need a model B Pi, the model A would work just fine if that’s what you happen to have on hand.You don’t need a very big SD card either but if you need to purchase one you might as well buy an 8GB card since the prices are so cheap now.The Block Erupters are one of the few ASICs that you can purchase without having to wait for a pre-order.

With a power requirement of only 2.5 watts each these are a good option for anyone looking to stop mining on their GPUs and move to a more power efficient mining rig.The three ASICs below are from the saphire batch and produce about 330 mh/s each.I ordered these from BTC Guild and received them in about a week.If you don’t have any Bitcoins to use for the ASIC purchase on BTC Guild’s store you can easily acquire some through Coinbase.The Block Erupters use a passive heatsink for cooling.After running for a few minutes the heatsink gets extremely hot, you can easily burn your hand on them if you are not careful.While using a fan isn’t required doing so keeps the error rate low and will probably extend the lifespan of the miners.The Arctic Breeze fan works good for this project since it has an adjustable gooseneck that allows it to be pointed where it is needed.This fan is almost completely silent too, I can barely even notice it when is running.This image shows how far you can bend the fan, it keeps my miners nice and cool.When I first looked at doing this project I was planning to use an Anker 10 port USB 3.0 hub that would allow the ASICS to sit vertically into the hub.

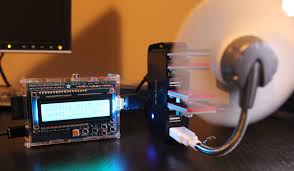
As I started researching this hub I found that many users reported issues with using the Raspberry Pi with the Anker hub.As I began reading I discovered that the Pi has several known issues with USB 3.0 hubs in general.More specifically it seems that the Pi has issues enumerating USB 1.x/2.x devices on 3.0 hubs.Since the Block Erupters are USB 1.1 devices they fall into the scope of this bug.Several people were reporting success with the D-Link DUB-H7 hub, and it is also listed on the RPi verified peripherals wiki page.I decided to purchase this hub to avoid any potential compatibility issues and I can confirm that it does work well with the Pi.There are quite a few different enclosure available for the Pi but the Adafruit Pi Box is a good fit for this project since the top portion of the case can be removed providing easy access to the GPIO pins on the Pi.If you happen to have access to a 3D printer or a Full Spectrum Hobby Laser you can download the SVG file and make your own case.If you purchase this case from Adafruit it comes as a kit that can be assembled very easily.Here is what the case looks like after it has been assembled.This video shows how the Pi Box is assembled.Adding the LCD to this project is optional but besides being very cool it gives you an easy way to check on the status of the ASIC miners.
Adafruit provides some python code that displays several screens of information on the LCD such as hash rate, errors, current Bitcoin prices, and network difficulty.So if you plan to run these miners without a monitor connected to the Pi then the LCD makes perfect sense.I also enjoy soldering electronics so the fact that the LCD comes as a kit adds to the general fun level of the project for me.I ordered the RGP Positive kit which has a muli-colored backlight (7 different colors).Adafruit also sells the same display as RGP negative, or blue/white.Here is what the Adafruit kit looks like.The picture below shows what the entire board looks like after assembly.The soldering difficulty level was pretty easy, the entire board took less than 30 minutes to build.The main screen shows the number of accepted shares, rejects, and average hash rate.Displaying the current BTC price, and the daily high and low price.Listing the number of devices and the hardware error rate.When using a fan the error rate remains below 1%.I’ve been running my ASIC mining rig for about a week now with very few issues.