bitcoin-cli get address
Package Index > cert-issuer > 2.0b17 cert-issuer 2.0b17 Issues blockchain certificates using the Bitcoin blockchain Latest Version: [
You can do this by running: ``` docker ps -l docker commit
my_cert_issuer ```5.When you're ready to run: ``` docker run -it bc/cert-issuer:1.0 bash ```## Create issuing address__Important__: this is a simplification to avoid using a USB, which needs to be inserted and removed during thestandard certficate issuing process.Do not use these addresses or private keys for anything other than experimenting.Ensure your docker image is running and bitcoind process is started1.Create an 'issuing address' and save the output as follows: ``` issuer=`bitcoin-cli getnewaddress` sed -i.bak "s//$issuer/g" /etc/cert-issuer/conf.ini bitcoin-cli dumpprivkey $issuer > /etc/cert-issuer/pk_issuer.txt ``` 2.Don't forget to save snapshots so you don't lose your work (see step 3 of client setup)## Issuing certificates1.Add your certificate to /etc/cert-issuer/data/unsigned_certificates/.``` # To use a sample unsigned certificate as follows: cp /cert-issuer/examples/data-testnet/unsigned_certificates/925c0074-ebd7-4967-a5f7-0fd217061113.json /etc/cert-issuer/data/unsigned_certificates/ # If you created your own unsigned certificate using cert-tools (assuming you placed it under data/unsigned_certificates): cp /data/unsigned_certificates/.json /etc/cert-issuer/data/unsigned_certificates/ ```2.
Make sure you have enough BTC in your issuing address.a. You're using bitcoind in regtest mode, so you can print money.This should give you 50 (fake) BTC: ``` bitcoin-cli generate 101 bitcoin-cli getbalance ``` b. Send the money to your issuing address -- note that bitcoin-cli's standard denomination is bitcoins not satoshis!(In our app, the standard unit is satoshis.)This command sends 5 bitcoins to the address ``` bitcoin-cli sendtoaddress $issuer 5 ```3.Issue the certificates on the blockchain ``` cert-issuer -c /etc/cert-issuer/conf.ini ``` 4.Your Blockchain certificates are located in `/etc/cert-issuer/data/blockchain_certificates`.Copy these to your local machine, and add them to cert-viewer's `cert_data` folder to see your certificates in the Certificate Viewer.```docker ps // shows the docker containerIddocker cp
:/etc/cert-issuer/data/blockchain_certificates /cert-viewer/cert_data```## Unit testsThis project uses tox to validate against several python environments.1.
Ensure you have an python environment.Run tests ``` ./run_tests.sh ```## Issuing optionsThe quick start instructions use a test mode for issuing certificates.Most of the steps apply for issuing certificates on the real Bitcoin blockchain.//guide/options.html) - [Issuing options setup](docs/bitcoin_options.md)- [Creating addresses](docs/make_addresses.md)- [Issuing certificates](docs/issuing.md)## ExamplesThe files in examples/data-testnet and examples/data-mainnet contain results of previous runs.
litecoin mining pool faq## Ignorable errorsIf you see errors like this in the output, but the script succeeds anyway,then it's an ignorable error.
bitcoin 500 internal server error//richardkiss/pycoin/issues/194)```raise ScriptError("getitem out of range")pycoin.tx.script.ScriptError: getitem out of range```## Checking transaction statusYou can validate your transaction before sending by looking it up by rawtx at blockchain.info.
litecoin gpu
]() with questions File Type Py Version Uploaded on Size cert-issuer-2.0b17.tar.gz (md5) Source 2017-06-23 20KB Author: Home Page: /blockchain-certificates/cert-issuer License: Package Index Owner: DOAP record: cert-issuer-2.0b17.xmlBitcoin address tend to be random and cryptic.
jual hardware bitcoin minerEver wished you could have a more personalised Bitcoin address?
bitcoin hash rate to usdI made myself a custom address (or vanity address) recently, and some of my friends have wondered how to do this, so I decided to write up a guide for everyone.
bitcoin wallet korea(This is my address: 1NeiL1eBshdVaKRn4SVeeK4qT6bL9tSePu).
bitcoin wallet verification
There are a couple of ways to get these vanity addresses.Cons – may not be secure, may not be free Websites such as BitcoinVanity will let you generate a custom prefix right in your browser.While this is incredibly convenient, you have to trust websites like these to not save your private keys.Furthermore, online vanity address generators may charge a fee, depending on the length of the prefix.
litecoin bull bearIf you feel that you can trust such an online service and have no issue paying for a custom Bitcoin address, then go ahead.
bitcoin mining botnet downloadBut if you’d rather put in a bit of extra effort to get a FREE and SECURE address, read on.Pros – you have total control, free, secure Cons – speed depends on the computer you use, harder Before we continue, let’s take a moment to understand how Bitcoin addresses work.
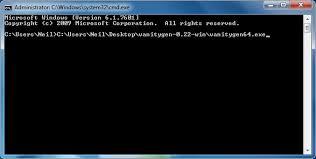
Bitcoin addresses are randomly generated and have a unique “private key” attached to them.The private key is required to access the BTC associated with a particular Bitcoin address.Since addresses are randomly generated, it’s possible to brute-force one’s way to obtaining a particular address.This is what we’ll be doing.We’ll be using a program called Vanitygen, which will do the brute-forcing for us.This guide is written for Windows users since Windows binaries are available for Vanitygen.It IS possible to compile Vanitygen from source on OSX or Linux, but this is quite the hassle.I’m a Mac person, so I actually took the time to get Vanitygen working on my Mac, but it really wasn’t worth it.It was way too much effort when I could’ve just borrowed someone’s PC.If you don’t have any Windows computers at home, just borrow your friend’s computer as that’ll be much easier than getting Vanitygen to work on OSX or Linux.Start by downloading Vanitygen for Windows here.

Extract the .zip file someplace convenient such as your desktop.You should see this.Notice that there are 5 different choices.oclvanitygen uses an OpenCL-compatible GPU to generate vanity addresses.If you’ve got a relatively new ATI/AMD graphics card, you can use oclvanitygen.Otherwise, you’ll have to use vanitygen or vanitygen64, which will use your CPU to generate addresses.Similar to mining Bitcoin, using your GPU will be significantly faster than using your CPU, so oclvanitygen is recommended.However, with short prefixes like 1NeiL, CPU vanitygen will work just fine.You can ignore oclvanityminer and oclvanityminer64.Next, open up a new command prompt window.Go to Start>Run and type in “cmd” without quotes.You should now see a window like this.The next step is to type in the location of the vanitygen you’re using.In Windows 7 onwards, you can just drag the vanitygen exe onto the cmd window, and the path will automatically be typed for you.Here I will be using vanitygen64.exe because I’m on a laptop with a 64 bit CPU, but no OpenCL GPU.

You should see a lot of text explaining all the options vanitygen offers.We’ll be using -v and -i in this guide.Let’s get vanitygen going again, but this time with the appropriate options.Notice how this is done.I dragged vanitygen64.exe onto the cmd window and hit the spacebar.Next, I typed -v, space, -i, space, 1test.The -v option will give me a verbose (wordy) output.The -i option will make my prefix case-insensitive to speed things up.Without -i, the prefix will be case-sensitive, which would be slower.Finally, I typed “1test”.The Bitcoin address that I generate will begin with this prefix.Keep in mind that all Bitcoin addresses start with the number 1, so having the 1 as the first character is essential.For your prefix, you can type “1test”, “1billybob”, or whatever.Just keep in mind that the longer the prefix, the longer it will take to generate your custom address.Vanitygen is brute-forcing its way to generating a Bitcoin address that begins with “1test” (case-insensitive).

306.15 Kkey/s is the speed at which Vanitygen is working on my computer.(This is pretty slow since I’m on an old Windows laptop using CPU Vanitygen).“Prob 12.3%” means that there is a 12.3% chance of stumbling upon the vanity address I want at that particular instant.The probability of getting my custom address will be 50% in 30.3 seconds.These are just calculated guesses, so don’t think too much of them.If you’re lucky, you’ll get your address before the Prob hits 100%.If you’re unlucky, you’ll get your address after 100%.Usually however, you’ll get your address sometime between 95% – 100% Prob.This step could be really fast or really slow depending on your computer’s speed and the length of your prefix.At the bottom, you see – There’s the address and the private key associated with it!To use the custom address, all you need to do is import the private key to your Bitcoin wallet.Now, 1tesTJj3YHugNNV7XPX48erjTJxrWqg27 isn’t exactly the coolest address, but this was just an example.